Sunday, December 30, 2007

Arrrrghh... my PSP is dead!!!

You were trying to play Tony Hawk's Underground 2 Remix on the PSP, while actually skating, and now you're left with a broken PSP. This hack will walk you through what can be done with your shattered PSP, as well as how to recoup as much of the original cost of the PSP as possible.

You're past the denial stage where you sat rocking back and forth in the corner of your room, cold and alone for hours, clutching it close to your chest, repeatedly switching it on and off, removing the battery, replacing the battery, plugging it in, hoping that suddenly your PSP would turn back on. You've followed all the recommendations in PSP troubleshooting in this blog. You took it to a friend skilled in the art of soldering. He opened up your PSP, gently reconnecting all the aged connections, perhaps even replacing the USB port. You tried new batteries and even an odd voodoo ritual that you discovered online. Nothing has worked. You've finally come to grips with the dreadful reality of it all: your PSP is dead.

Although everything has seemed hopeless during your futile attempts to resurrect your PSP, don't throw that PSP away in frustration. There are several different things you can do with it, and this blog will discuss some of the possibilities.

How to Put the Buttons and Shell into Place?

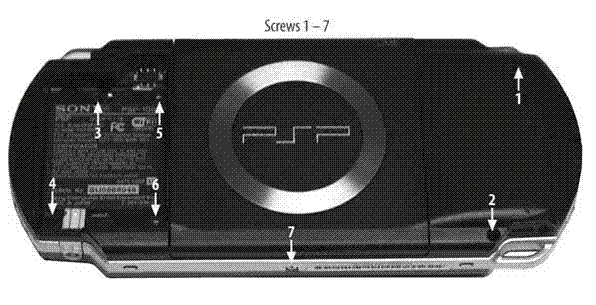
You're almost there! Try not to jump ahead and insert the battery just yet. Honestly, it is all downhill from here. The figure in previous post provides you with an illustration of where to insert the final screws.

Here's how to wrap things up:
  1. If you took the left and right trigger buttons out, now is the time to put them back in.
  2. Insert the circuit ribbon connected to the LCD buttons into its slot on the right side of the PSP.
  3. Lay the button strip onto the LCD and click it into place.
  4. Carefully clean off any smudges on the LCD using a soft cloth.
  5. Lay the PSP top onto the device and apply pressure to snap it into place. Be sure that the bottom button strip lines up.
  6. Flip the PSP over onto its back and insert screws 1, 2, 3, 4, 5, 6, and 7.
  7. Finally, insert the Memory Stick and battery/cover back into the PSP.

Wednesday, December 19, 2007

How to reinstall the LCD?

You are nearly there. The trickiest part of this step is to be sure that the LCD backlight power strip (the small one) is properly seated. You will note two small extensions on the sides of the strip near the end. These will come in handy when you attempt to seat the connector. Figures below highlight the areas you will be working with when reinstalling the LCD.

To reinstall the LCD:
  1. Lay the LCD tray into place. Do this slowly and carefully, since the wrong position can cause problems. The top of the tray should slip behind the USB connector. The bottom of the tray has a screw mount that slides under/behind the black PSP shell. Finally, the left side of the tray merges with the left controller. Once it is in place, shut the UMD tray. If it clicks smoothly shut, the tray is probably installed correctly.
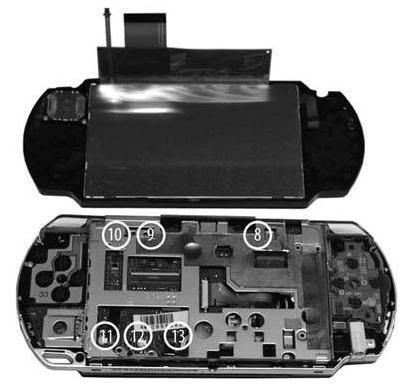
  2. Insert and tighten screws 8, 9, 10, 11, 12, and 13.
  3. Flip the LCD over on its back, slide the large and small circuit ribbons into their respective slots, and close the catch. Start with the large ribbon first, and then do the small ribbon. Use the little wings on the small ribbon to guide it into the catch.
  4. Flip the LCD over and carefully insert it into the tray. Start with the right side, and then apply light but firm pressure on the left side to click the LCD into place.

Tuesday, December 18, 2007

Installing the Main Circuit Board

This post is about the hardest part of reassembling the PSP. It can be a bit tedious to ensure that you have the board seated correctly, but patience is necessary. Pay attention to the critical areas highlighted in picture below:
To install the main circuit board:

  1. Place the main circuit board in roughly the correct location.

  2. Carefully bend out the top of the PSP plastic case and slip the USB connector into its corresponding hole.

  3. Line up the screw holes and apply a slight but firm pressure about one inch in from the left side of the circuit board. This is to seat the connector on the other side of the board into the smaller circuit board that holds the WNIC and Memory Stick components.

  4. Run the antenna wire across the circuit board and install the wireless antenna. Once the antenna is properly seated, install the antenna wire correctly, ensuring it is held in place by the black fuzzy tape, and that it is threaded through the channel on the right side of the PSP.

  5. Line up and insert screw 15 to install the left controller. If you removed the left controller completely from the PSP, be sure to connect the circuit ribbon.

  6. Insert screw 14 in top-right hole of the main circuit board.

  7. Connect the white power connector to the PSP circuit board, using the fuzzy tape to hold the wires onto the board.

  8. Lay the right controller on top of the antenna and snap it into place, paying attention to the catch on the lower side of the controller circuit.

  9. Connect the right controller strip by sliding the ribbon into the catch. It will slip under the tiny silver guides on each side of the catch. Finally, flip the brown movable part of the catch down into place.

  10. Slip the UMD drive circuit ribbon into its catch. Be sure that the black part of the catch is in its Out position. Otherwise the ribbon will not insert into the catch. Once it is lined up in the catch, apply pressure to both sides of the black catch to seal the connection.

Saturday, December 15, 2007

How to reinstall network card?

This step is fairly simple, with the only tricky part being the correct insertion of the WNIC (wireless network interface card)/Memory Stick circuit board. Be sure to take advantage of the many guide pins included in the PSP to ensure that you insert this component, and others, correctly.


To install the network card:
  1. Insert the small circuit board, wireless network card side down, into the PSP by placing the bottom of the circuit board in first at an angle. Be sure that the wireless antenna is wrapped around the side of the board.

  2. Lay the metal grounding separator in, with the long end at the top. Align the guidance pins and the circuit socket to be sure the separator is in the correct location.

  3. Place the black plastic supporting piece on top of the WNIC, ensuring that both the top and bottom guide pins slip through their respective holes. Be careful to not break the wireless on/off switch as you insert the black plastic piece. You will probably have to move the switch into the On position for easiest installation.

  4. Insert screws 16, 17, and 18.


Friday, December 14, 2007

How to remove network card from your PSP?

The following requires you to remove several components before you actually get the network card board (SWU-BXJ154N). This part of the removal is layered, so be sure to follow the instructions. Figure 1 highlights the significant pieces and Figure 2 provides a shot of the network card with antenna and wire.

To remove the network card:

  1. Remove the silver screw (16) from the top left of the PSP, holding the silver tray onto the device.
  2. Remove the silver screw (17) from the bottom left of the PSP, holding a black plastic supporter.
  3. Remove the silver screw (18) from the left of the PSP, holding the black plastic supporter.
  4. Lift the black plastic piece out and then remove the silver grounding tray.
  5. Lift the network/Memory Stick combo circuit board out of the PSP shell.

Thursday, December 13, 2007

How to remove PSP mainboard?

This part of the disassembly process is the most difficult. The main board is connected via screws, a USB connector, and a circuit connector hidden under the board. In addition, there are wires at the lower end of the board that connect to the speakers and components under the board. You do not have to remove these to get under the board if you simply flip the circuit board over onto its top when it is removed.

To remove the main circuit board:
  1. Unlatch the right controller circuit strip and the UMD drive circuit strip.

  2. The controller lifts from the bottom, and the UMD catch requires slight pressure from the left against the black plastic arms.

  3. Remove screw 14 from the top right of the circuit board.

  4. Remove screw 15 from the left side of the left controller.

  5. On the top right of the main circuit board, carefully remove the power connector (white with black wires). This will require you lift the board first before disconnecting the white plastic socket.

  6. On the lower side of the left controller, pry up the circuit board over the catch and lift the controller over the top of the PSP.

  7. Peel back the tape holding the black power wire and lift the antenna off the main circuit strip, disentangling it from the tape and the right controller.

  8. Slowly lift the circuit board up off the PSP by slipping out the USB connector from the top plastic shell, then raising the top of the board and flipping it over the bottom of the PSP. You will need to apply pressure and pry the board off a hidden connector that keeps the board connected to components deeper inside the PSP.


Chip 1

CXD2962GG

©2004SCEI

507D10E

641711


Chip 2

CSD1876

©2004SCEI-102GG

504A99E

278491


Chip 3

SAMSUNG 501

K5E565H8CM-D060


Chip 4

SC901583EP

MXAEA0423


Chip 5

MB44C001

0505 M51

Sunday, December 9, 2007

How to remove the LCD Tray?

The most important part of this stage is that you carefully record where each screw goes. Since most of the screws are different sizes, it would be easy to mix them up. Picture below illustrates where each of the screws is located.

Be careful not to strip the screws. It is better to apply pressure to ensure the screwdriver head does not slip than it is to strip the screw.

Here's how to remove the LCD tray:

  1. Remove the silver screw (8) from top right of tray.

  2. Remove the two silver screws (9 & 10) from the top left of the tray.

  3. Remove the two silver screws (11 & 13) and one black screw (12) from the lower left of the tray.

  4. Eject the UMD disk tray.

  5. Lift the tray from the bottom of the PSP and slowly wiggle it loose from the UMD catch at the top of the PSP.

Friday, December 7, 2007

How to remove the LCD?

The next step is to remove the LCD from the PSP. Be careful, as this is arguably the key component to your device and almost certainly the most expensive to replace. A scratch or too much pressure could cause serious problems.

  1. Carefully pry the catch off the left side of the lower button circuit strip with a small flat head screwdriver.

  2. Lift the button bar assembly off the PSP.

  3. Carefully release the catch to the circuit strip that connects the bar to the PSP. This is accomplished by using a small flat head screw driver to lift the brown catch up, which allows the circuit strip to slide free of the catch.

  4. The LCD is held in place by four bevel catches to keep the LCD screen in a metal LCD tray. Carefully slide a flat head screwdriver between the LCD screen and the tray at the top-left corner and lift the LCD screen out of the tray. Once it has freed the catch, do the same on the lower-left side of the LCD tray. Once this side is free, slowly lift the LCD screen up a few millimeters out of the tray and then lift only the top of the LCD screen. There are two circuit strips behind the LCD that need to be removed before taking out the LCD.

  5. Lift the left (smaller) catch from the top to release the circuit strip.

  6. Lift the right (larger) catch from the bottom to release the larger strip.

Getting a feeling when releasing the catches takes a little practice. You must not break off the plastic catches or break a circuit in the connector.

Thursday, December 6, 2007

How to remove the top of PSP?

Prior to beginning, place your PSP and all tools on a clean and clear surface. I recommend you have some sort of mat to provide some comfort for your PSP while its internals are removed. Next, create a few sketches of your PSP on the piece of paper, in order to track where the screws go when trying to put the PSP back together again.


Here's how to take the top off:
  1. Remove the battery cover and remove the battery.

  2. Take out the Memory Stick.

  3. Remove the black screw (1) from the upper-right quadrant

  4. Remove the black screw (2) from the lower-right quadrant.

  5. Remove the warranty seal from inside the battery cavity (yup, you've just voided the warranty).

  6. Remove the black screw (3) from the upper-left quadrant (battery cavity).

  7. Remove the black screw (4) from the lower-left quadrant (battery cavity).

  8. Remove the silver screw (5) from the battery cavity.

  9. Remove the silver screw (6) from the battery cavity.

  10. Remove the silver screw (7) from bottom side of PSP.

  11. Turn the PSP over and slowly lift the top shell off.

Wednesday, December 5, 2007

Preparation before you start dsimantling your PSP

Tools
It is recommended that you prepare the following tools. You may not have to use them all, but everything can go much more smoothly with these tools available:

  • Paper and pen for taking note on screw placement

  • Small flat head screwdriver

  • Small Phillips head screwdriver

  • Needle nose pliers (good for picking up dropped tiny screws)

  • Flat and clean white surface (easier to see small parts)

  • Digital camera for documentation, it would be helpful when you have trouble reassembling your PSP.


Preparation
You also have to make these preparation:

  • Remove the battery when instructed and leave it out when taking apart the PSP. In addition, do not attempt to plug in any power source to the PSP until it is fully reassembled. You can easily fry critical parts of PSP.

  • Use extreme care when releasing circuit strip/ribbon catches, since they can easily break.

  • Do not drink or eat around the open PSP. A shower of cola on your dismantled PSP would be a kiss of death.

  • Do this in a quiet area. There is nothing like a hyper-naughty kid, slobbering pet, or three-foot drop to turn your PSP into a $250 paperweight.

  • Be careful how much dust is in the air. Since your PSP will be apart, it is easy for that dust to cause problems at a later date if it takes up residence inside the device.

Monday, December 3, 2007

How to keep your PSP screen smudge-free?

The most obvious way to keep the screen on your PSP smudge-free is to avoid touching it with your hand, keep your hands as dry, clean and grease-free as possible, and keep soft non-abrasive cloth nearby to wipe smudge. If these methods do not work for your PSP, there are some alternatives.

One option is a commercially available plastic screen. There are currently a number of plastic screen that keep your screen smudge-free. The anti-glare version works very well, as I have one that I've used, but I usually end up using it only while playing video games. The matte finish tends to make the picture quality of movies look a bit fuzzy. You may also can buy the ultra-clear version to maximize the clarity of your screen.

If you think branded plastic screen a bit too expensive, you may find inexpensive cellophane at your local craft store that will most likely work just as well.

Overall, remember that the best way to keep your PSP clean is to prevent it from getting dirty in the first place.

Saturday, December 1, 2007

How to clean your PSP?

You could use soft cloth that is included with your PSP to wipe off the smudged screen. But after long-term use and it is more than smudged. Turn it off, use a damp cloth to clean the casing. Do not use any cleaning solvent products, as they could harm your PSP.

If something sticky gets on your PSP casing, put a tiny amount of cooking oil on a soft cloth and use it to clean it off. Then to remove excess oil, use a damp cloth with a a little amount of soap.

If something stucks inside the ports , such as the USB jack, headphone jack, or the power jack, gently rub the open ports with a soft dry cloth. If something stuck inseide the Memory Stick compartment or the UMD compartment, use a compressed air can to loosen up dirts out of these areas. If the lens inside the PSP that reads the UMD disks seems to be dirty, you can try putting a tiny bit of the solution from a DVD/CD cleaning kit on the end of a Q-Tip and reach carefully inside your PSP to clean the lens. Make sure the solution is safe for your PSP.

Thursday, November 29, 2007

How to prevent your PSP from getting dirty?

When you are dealing with dirt, the best offense is always a good defense. It may sounds like cliches but that a sound advice. If you do not want your PSP to get dirty, keep it in an environment which is free of free of dirt. Do not leave it lying around your home uncovered, put it in the drawer or best on its package box. If you want to keep the PSP clean, yous must make sure that you keep all related devices of the PSP and clean. Keep your UMD discs in its cases and use clean USB cables to connect your PSP to your computer. If you find an old USB cable sitting in the corner of a drawer that, for some unknown reason, had crumbs and dirts across the bottom, you must take the time to ensure that all dust or pieces of crumbs that were in the drawers were carefully cleaned before you put the connector in your PSP.

In addition in maintaining your PSP and all devices of the PSP own, be sure that you are clean yourself. If you find your PSP always greasy and smudged look no farther than your own greasy hands, wash hands before playing. Make sure that they are clean, dry and free of grease when you want to play. If you do not want smudges on the screen, do not to touch the screen.

Frequent PSP Problems

All of the buttons of my PSP suddenly stopped working.

Be sure that you during playing you have accidentally slide the power button into the Hold position.

My PSP abruptly enter sleep mode during a game/movie/etc.

Be sure that you didn't accidentally slide the power button up into the Sleep position.

There's no sound/the sound too low.

Be sure that you have the sound volume turned up and you didn't accidentally hit the music note button (which mutes the console), and that you do/don't have the headphones plugged in (depending upon whether you are wearing headphones or not).

The picture on the screen is too dim/too bright.

Hit the little square button underneath the screen. This toggles through different screen brightness settings.

I cannot connect to my wireless network.

Be sure that you have turned on the WLAN switch on the bottom-left corner of your PSP.

My PSP's screen has a dead pixel.

If it is an actual dead pixel, then it isn't fixable. Learn to live with it, or try to sell it online and buy a new PSP. However, you may just have a stuck pixel. This may be fixable. There's an MPEG4 video available from various online PSP-associated sites, such as PSP Hacker (http://www.psphacker.com), called Dead Pixel Cleaner by Placasoft. This two-minute video will need to be loaded onto your Memory Stick. It flashes through red, blue, and green repeatedly and rapidly, filling your PSP's screen. The rapid instructions to change between these three key RGB colors can sometimes stimulate a frozen/stuck pixel, knocking it back to full functionality. So, if you have what looks to be a dead pixel, give this video a try. I've read several recommendations online that say you should leave it running in a loop for a good couple of hours, checking intermittently to see whether it has had any effect. You might learn that your dead pixel is just a stuck pixel when you find it quickly unstuck.

Tuesday, November 27, 2007

What to do if your PSP cannot be turned on?


  • If your PSP can't be turned on, naturally you need to check the power first. Hopefully the battery has been fully depleted. Plug in the AC power adapter and see if the power indicator light turn orange which indicates charging. If that's happen, see if the PSP can now be turned on. If so, luckily your battery simply depleted.
  • If the power indicator light did not turn on or turn orange when you plugged in the PSP, then see if you can turn the PSP on. If the PSP can be turned on then look on the upper-right corner of the screen. Is the battery indicator is stills shown? Then, perhaps the battery is simply discharged and being charged, but for some reason the charging indicator light won't turn on. Unplug your PSP and see if it stays powered.
  • If it is completely shuts down, then it is most likely something is wrong with the device or the battery. It is best to contact your local vendor.
However, if you want check your PSP before sending it to the vendor, you can open the battery cover on the back of your PSP. Remove the battery and check the metal contacts, be sure that they are clean. Wipe gently with soft cloth when dirty. Insert the battery and repeat the above steps. If it still fails to work, lend a good battery so you can sure that the battery or your PSP is the culprit. If your PSP turn on with your friend's battery, then luckily your device is OK, it is better to replace the battery than sending your PSP to your local vendor for repair.

Monday, November 26, 2007

What to do if your PSP can't read the memory stick?

First of all, remove your memory card the put it back into your PSP and make sure it is firmly and properly inserted into your PSP.

Check the parts
If it still cannot read, remove the card again and examine closely the metal conductors contacts of the card, there should be slight abrasion present, it's OK, but if you find dirts , clean it off. Take a soft cloth and wipe gently. If the metal contact is badly scratched, your card beyond repair. You can avoid scratched contacts by limiting the frequency of swapping in and out the memory card. Backup the data often! With prolonged use, memory cards would eventually damaged.

Check inside the card slot.
Make sure that the slot is physically in normal condition, if the area around the slot dirty, hold the cover open, turn the PSP on its other end, and shake gently to try to remove any dirts. Compressed air is the best way to loosen up dirts. Blow short bursts of compressed air on the slot to loosen up anything that stuck in there, and your PSP on its end and shake again.

Check the data integrity
If you have a card reader, connect the Memory Stick up to your PC. If your PC can't read it, your memory card is already unusable. However if the card can be read by your PC, backup the entire data of your memory stick, then delete all files inside your memory stick, format the memory stick then restore the data back to the memory stick.

For best result, format your memory card in your PSP not in your PC
  1. Goto Settings System Settings and hit the X button.
  2. Select Format Memory Stick from the list of settings and hit the X button.
  3. The PSP will ask you twice if you are sure that you really want to format the Memory Stick. Select Yes and hit X, then select Yes again and hit X again. This will erase all of the data on the Memory Stick.
  4. Restore the data

If all these efforts fail, there are only two possibilities, your card is damaged and the PSP memory slot is damaged. Try to insert another good memory card in your PSP, if it is cannot be read, then the problem is with your PSP. Contact your local vendor for repair arrangement.

Sunday, November 25, 2007

What to do if UMD Game/Movie Won't Load?

This problem is the most common for PSP

1. Clean the disk
Breathe lightly on your disk, take a non-abrasive wiping cloth, clean the UMD disk just like cleaning a DVD/CD. You may also try the compressed air cans, which is available in computer/electronic store. If there are any particles or dust on the disk, try blowing these particles off. Consider using a compressed air can to blow particles from the inside of the disk; you can find these cans in any computer or electronics store. There is also UMD disk-cleaning solution available, which would clean your disk as clean as it can be.

2. Check the clear plastic cover on the disk.
If your hard UMD has been put under pressure inside a bag, the plastic cover on the top of the disk may snap loose from the frame of white plastic disc. The plastic cover will put pressure on the back of the disc, which prevent it from spinning when the UMD is placed inside the PSP. If this happens, you may hold the UMD disc on the edge of the white plastic casing, and then take your index finger and gently push up against the middle of the disk until you hear a slight clicking noise. If all goes well, you have successfully putting back the plastic lid in place and the disk will rotate correctly the next time you insert it in the PSP.

3. Is it a bad UMD?
Even after you try to clean the UMD with the cleaning solution and it is still fail to load, then the bad news is that the game or film is dead. It's time to buy the replacement.

4. Check your PSP.
If none above works, things may be worse than it should, but there is absolutely no reason to panic. The inside of your PSP may be dirty, open the tray door and shake slightly to get dirts and bits out from your PSP, it is better if you use the compressed air cans to loosen dirts inside your PSP.

Still not work? Then you need a professional repair help. Contact your local vendor.

How to make wireless network most secure for your older PSP versions?

If you have a PSP with the older version 1.01.52 firmware, your only option for wireless security at your disposal is only WEP, which is most easily cracked protocol for wireless encryption. WPA is a more secure solution for PSP.

However, WEP is better than nothing at all. If you use the older firmware, you should configure your network WEP with a password in order to access your network settings on your PSP (Settings>Network Settings, press the X button and choose Infrastructure mode, and again hit the X button). Choose the connection that you want to change and move forward until you reach the WLAN Settings pane.

Make sure your wireless network appears under the name SSID. If it does not, scroll to Scan, hit the X button, select your wireless network from the list that appears on the next page, and click the X button again. This will take you back to the Settings page wireless network.

Now, scroll down to where it reads 'None' for the encryption and then click X. Use the arrow up or down on the keyboard to change from 'None' to 'WEP' and then press the start button X. Now hit the right arrow keys to bring up a screen asking you to enter your WEP key. Hit the X button, and the PSP of the screen text entry will be displayed. When you are finished entering your password, scroll to the Enter key on-screen text entry and click the X button again.

If you already have newer firmware with WPA established in your current network, you need to disable it, in order to allow PSP with version 1.01.52 firmware to access your network. If you have a PSP with version 2.0 firmware, however, you can define the parameters WPA on your PSP to work with your network WPA enabled. It will be almost identical to the procedure to enable WEP, except you switch down to 'WPA-PSK' for the WLAN Security Configuration and enter your password WPA.

Network performance would be better without these security measures, so if you connecting to a wireless network in a thick walled room, just disable this security settings for maximum network performance.

PSP background color by month


Month

PSP background color

1. January

White/grey/silver

2. February

Light yellow/gold

3. March

Light green

4. April

Pink

5. May

Dark green

6. June

Blue/purple

7. July

Ocean blue/teal

8. August

Dark blue to light blue

9. September

Purple

10. October

Dark yellow/gold

11. November

Sepia/brown

12. December

Red

How to permanently change background color?

PSP background change on monthly basis, however you can make it stay with only one background color. This trick is only applicable with Version 2.0 firmware,
1. Go to Settings > Theme Settings, hit the X button, select Theme, hit the X button again
2. Select a color from the menu that is shown on the right. The colors will change when you select any options in the list. However if you choose Original, then the color will change each month. Then select the X button to make your selection and your PSP will permanently have one background color.

How to connect PSP to Linux?

Latest Linux distributions should be able to detect PSP automatically. You may want to examine the kernel messages with dmesg to see what device the PSP was recognized as:

 $ dmesg
Linux version 2.6.8.1-5-686 (buildd@vernadsky) (gcc version 3.3.4 (Debian 1:
3.3.4-9ubuntu5)) #1 Wed Aug 17 23:34:53 UTC 2005
BIOS-provided physical RAM map:

[…] lots of output deleted […]

scsi0 : SCSI emulation for USB Mass Storage devices
Vendor: Sony Model: PSP Rev: 1.00
Type: Direct-Access ANSI SCSI revision: 02
USB Mass Storage device found at 2
usbcore: registered new driver usb-storage
USB Mass Storage support registered.
SCSI device sda: 487936 512-byte hdwr sectors (250 MB)
sda: Write Protect is off
sda: Mode Sense: 00 6a 20 00
sda: assuming drive cache: write through
/dev/scsi/host0/bus0/target0/lun0: p1

If however your PSP is not automatically detected, run the command modprobe usb-storage as the root user and run dmesg again, check its output. You should be able to identify the device, you can mount it with the following commands (if it was identified as sda, you want to use sda1, as the first partition):

 $ sudo mount /dev/sda1 /mnt -o uid=$USER
$ ls -l /mnt/

total 128
-rwxr--r-- 1 me root 5125 2005-09-04 12:35 index.html
-rwxr--r-- 1 me root 4060 2005-09-04 12:34 make_index.pl
-r-xr--r-- 1 me root 0 2005-01-30 22:28 memstick.ind
drwxr--r-- 4 me root 32768 2005-09-02 22:50 mp_root
-r-xr--r-- 1 me root 0 1979-12-31 23:00 mstk_pro.ind
drwxr--r-- 9 me root 32768 2005-04-08 23:55 psp

The sudo command will let you to run mount as root user, and the -o uid $USER tells Linux to mount it so that the currently logged-in user is the owner of the files on the stick.

How to quickly copy PSP files in Windows?

1. Let's assume your PSP memory card location is E:\PSP\SAVEDATA

2. Create a new folder in your hard drive for example C:\gamesaves\

3. Open Notepad, type the following

cd e:\PSP\SAVEDATA\
xcopy e: c:\gamesaves\ /S

Hit Return between each line.

4. Save the file as, 'copyPSP.bat', put the file wherever you want for example in your desktop, now whenever you want quickly copy all files in your memory card to C:\gamesaves\, just double click this file.

How to connect PSP to Mac OSX?

First of all, you need to have a PSP folder on your desktop for this procedures to work

1. Run the Terminal in /Applications/Utilities/ then type the following in command line,

 open /Volumes//PSP/SAVEDATA/
2. Replace with the actual name of the memory card as it is displayed as mounted on the desktop. Usually, it will be "Untitled." If the name has been changed to something like "My PSP Card," then you will need to add an \ before the space in the name. For example, if your Memory Stick were named "My PSP Card" you would type the following:
 open /Volumes/My\PSP\Card/PSP/SAVEDATA/
3. Press Return. Then the folder in the Finder would open, then drag all the files that you want to your Mac.

However, if you want this process to be GUI-free, just type the commands:

 cd /Volumes/Untitled/PSP/SAVEDATA/
cp -R * ~/Desktop/PSP/
Hit Return after each line. The first cd command will change the directory of the mounted Memory Stick (In this case it called Untitled) to the SAVEDATA folder. The cp -R command will then copy all the files and folders within this folder into a folder called PSP on your desktop.

Friday, November 23, 2007

Things to remember when connecting PSP to your computer

Improper connection between PSP and PC may damage data inside the memory card.
  • It is happen whenever you connect a PSP that is still in Sleep Mode to your PC using USB cable.
  • Always dismounting the memory card before disconnecting your PSP from your PC
  • Make sure PSP would not fall into Sleep Mode when it is still connected to the PC, you can avoid this by turning off the Auto Sleep feature inside the Power Settings menu. You can still conserve power by turning on the Backlight Auto-off setting, also under power settings into two minutes (the lowest setting)

You may consider buying an USB cord to supply power to the PSP.
Your saved games are all stored inside PSP>SAVEDATA subfolder inside the memory card. Copy it to your PC hard drive or burn it to a blank CD.

Always remember to dismount the memory card before disconnecting the PSP, in Mac you do this by dragging the Memory Card icon into the trash or in Windows by "Safely Remove Hardware". After PSP is dismounted, then press O button in your PSP to fully disconnect the PSP from the PC, then you may unplug the USB cable from the PC.

Copy and Delete files in your PSP

On the game menu, between Game Sharing and UMD/Memory Stick (if you have a UMD disk inserted), there is the Saved Data Utility. Highlight it and hit the X button.

You'll be shown the list of saved game files, along with the screenshots and all related informations. If you hit the triangle button you can Copy, Delete or just want to see the detailed information of the file. A dialog will tell you "You will be asked to change the Memory Stick 3 times. Press the X button to begin." Hit X to begin the copy process or O to go back to the previous menu

This way you can copy your saved games to let friends play it in their own PSP or you just want to make a backup in other memory card. So even you already have the 2 Gb memory card, you can still use the 32 Mb memory card included with your PSP to backup your important saved games. The file copying process between memory cards actually involves a few minutes of swapping out two memory card for a total of six times.

The Delete and Information options are quite straightforward.

Boss is coming! How to quit PSP instantly?

So you're in a busy project, feeling so bored and tired and you pull out your PSP and start up a quick game, just to relax for 5 minutes. Then the boss walks in. How can quit the game, save your game and save your job at the same time?

The power button on the right bottom corner of PSP can be pressed quickly to turn off without ruining the game you are currently playing. The quick push of the power button up and then back down to the locked position can become rather habitual when the phone rings or some other emergencies.

Do remember that make sure, PSP is not writing anything to the Memory Stick Duo while you quickly turn off the device. It is indicated by the flashing orange light at the bottom left of PSP. If there is no light you are safe.

If you want to play your PSP in your cubicle safely, make sure you have the bottom drawer of your desk open and filled with cotton or clothes to cushion the shock subjected to your PSP when you need to toss it real quickly.

When the boss approach, quickly and calmly turn it into power save mode and drop it to the bottom drawer. While you are playing always, keep part of your hearing and other senses to detect movement and noises outside your cubilce. Practice for a couple of time, it would be quite easy.