Prior to beginning, place your PSP and all tools on a clean and clear surface. I recommend you have some sort of mat to provide some comfort for your PSP while its internals are removed. Next, create a few sketches of your PSP on the piece of paper, in order to track where the screws go when trying to put the PSP back together again.
Here's how to take the top off:
-
Remove the battery cover and remove the battery.
-
Take out the Memory Stick.
-
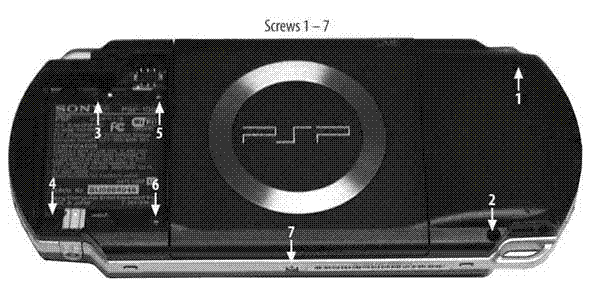
Remove the black screw (1) from the upper-right quadrant
-
Remove the black screw (2) from the lower-right quadrant.
-
Remove the warranty seal from inside the battery cavity (yup, you've just voided the warranty).
-
Remove the black screw (3) from the upper-left quadrant (battery cavity).
-
Remove the black screw (4) from the lower-left quadrant (battery cavity).
-
Remove the silver screw (5) from the battery cavity.
-
Remove the silver screw (6) from the battery cavity.
-
Remove the silver screw (7) from bottom side of PSP.
-
Turn the PSP over and slowly lift the top shell off.

No comments:
Post a Comment