Friday, May 30, 2008

PSP browser by Nomad


One of the links that you'll find under the PSP section of the PSP Web Portal's main page is to the PSP browser (http://www.allxboxskins.com/pspbrowser.php). This PHP-based page embeds a browser inside the Wipeout Pure browser, so that you can surf different sites and keep a handy address bar at the top of the screen with instant access to Google. This solution helps avoid having to return back to the main portal page whenever you want to navigate to a new site that isn't linked on the page you are currently viewing

PSP Web Portal by Fujimax.


Once you click on X, the main page of the PSP Web Portal will load. Use the directional keypad to jump around between the different hyperlinks on the page.

There is a link to Google (http://www.google.com) in the upper-right corner of the screen, and an address bar at the bottom of the screen via which you can pull up any web page you like. Additionally, there is a list of links (tech, news, misc., psp) on the right-hand side of the screen. If you click on one of these links, a series of related links appears below a graphic of the link category.

If you move down to the address bar on the bottom of the page and hit the X button, the PSP's default text-entry screen will appear. I Highlighting Enter and hitting X brings me back to the PSP Web Portal screen.

After entering the address on this screen, I highlight the Enter button and hit X. This returns me to the PSP Web Portal with the text I just entered appearing in the address bar at the bottom of the page. Navigating to the Go button next to the address bar and hitting the X button loads the page. If you are used to flawless Web browsing on a broadband connection, prepare for a rude wake-up call. The Wipeout Pure browser can move very slowly at times, especially on graphics-rich sites that aren't designed for a small screen. My site loaded, although without the background graphic, and while the text loaded rather quickly, some of the images took some time to load. As you can see, the site is legible and the picture shows up clearly. However, it took about five minutes to load.

Have some fun exploring all that the PSP Web Portal has to offer. Whenever you become too lost in the Web, simply hit the Start button and choose "Go to Home Page" to return to the PSP Web Portal or Quit to return to the main menu of Wipeout Pure.

Redirecting the browser


Repeat all the steps from the last section up until you are ready to select your default connection. Highlight the connection and hit the Triangle button. An overlay menu will appear on the right side of the screen. Use the directional keypad to select Edit from this menu and then hit the X button.

All of these settings can be accessed from the main Settings menu on your PSP (Settings Network Settings). For the purposes of this hack, I'm showing you how to edit a preexisting connection from within Wipeout Pure, but if you think you will be surfing the Web via your PSP on a regular basis, it makes sense to set up a few extra connections.

I have three connections set up. Connection 1 is just the default connection for game playing over the Internet and downloading PSP updates and in-game downloads such as the Gamma Pack 1. The other two connections connect to various online portals, which I am about to discuss.

Once you select Edit, you will be presented with a series of screens. The first screen is the connection name. If you want to change it, you can, but I'm leaving it as Connection 1. Simply hit the right directional keypad to move on to the next screen. This is the WLAN Settings screen. Highlight Scan and press X to scan for any networks in range. Pick the one you want and hit X again. You will be returned to the WLAN Settings screen. Hit the right directional key to move on to the next screen. Configure the appropriate WLAN security settings and hit the right directional key again.

Now you will be presented with the Address Settings screen. You have a choice between Easy and Custom. Select Custom and hit the X key. This will immediately bring you to the IP Address Setting screen. You can either leave this set to Automatic and move on to the next screen to make the necessary changes to your DNS Settings to use a public PSP web portal, or you can choose Manual and hit the X button.

In the Manual Network Connection pane, I gave the PSP an IP address of 192.168.1.18 (so that it would not conflict with the other IP addresses I've assigned on my network), left the subnet to the default 255.255.255.0, and set the Default Router to 192.168.1.1, the address to my wireless access point. To make the changes, you have to hit X on each field you want to change, and then scroll up and down using the directional keypad until you hit the right number, then hit X again to get to the next field. If the network you are connecting to uses automatic (DHCP) assignment for some or all wireless users, you're better off selecting Automatic for the IP address assignment. My manual settings will probably not work for you.

If you'd rather not spend all this time making sure that the IP and Subnet settings are all perfect, you can skip much of this by selecting Automatic instead of Manual on the Address Settings screen, then when the DNS Settings screen appears, selecting Manual. This will allow you to only change the relevant DNS settings before moving on.

The important change for this hack is the Primary DNS. Even if your network uses DHCP assignment, you must override its default settings. You should make the Primary DNS 24.3.244.76, which is the address of the fujimax PSP Web Portal. If you want to check out the fujimax PSP Web Portal before performing this change on your PSP, visit http://24.3.244.76/wipeout/index.html from your desktop computer. You can, if you'd like, set the Secondary DNS to the DNS server that the wireless access point is configured to hand out. Although this gives you a back up if, for whatever reason, the fujimax PSP Web Portal is down, it won't let you redirect the browser to the PSP Web Portal.

The IP address of the fujimax PSP Web Portal changed once before from 67.171.70.72 to 24.3.244.76. If you try to access it and it doesn't come up, check in the sidebar of the blog associated with the portal (http://genius.fujumax.com/weblog/index.html) to see whether the IP address has changed yet again.

After you have completed all the proper entries, click on the right arrow on the directional keypad to move to the next screen. Make sure that Do Not Use is highlighted under Proxy Server and then hit the right arrow again to move on to the Setting List screen, which will give you a summary of the settings you have just entered. Hit the right arrow button again and press X to save your settings.

If you are on Version 2.0 of the firmware, you'll be asked whether you want to launch an Internet browser before you review your settings. You can choose Do Not Start unless you are in a hotspot that requires you to log into a web portal before you can access the Internet. Of course, 2.0 users don't need to use the Wipeout Pure hack, but I'm sure some of you want to try it out anyhow!

This will return you to the Select Connection screen. Select the connection that you just edited and hit the X button. When you hit this, the PSP sends out a request for http://ingame.scea.com/wipeout/index.html, but since you changed the Domain Name Server to 24.3.244.76, the request for this page is redirected by that DNS server to http://24.3.244.76/wipeout/index.html, the address for the fujimax PSP Web Portal. Click on the X button to enter the portal.

Saturday, May 24, 2008

Using Wipeout Pure browser


Grab your copy of Wipeout Pure and stick it in your PSP. Click through all the beginning bits and load any preexisting game profiles. After you do all this, you should be presented with Wipeout Pure's main menu. Select the Download option and hit X.

When you select Download, an overlay screen will pop up saying "Game Experience May Change During Wireless Play." Select OK and press the X button. This will bring up another overlay screen for your Network Connection, prompting you to select from your preconfigured network connections.

Choose your default connection and hit the X button. This will load the Wipeout Pure browser, and the default browser page will be displayed with any available downloads. If you get an error message saying, "A connection error has occurred. The WLAN switch is not turned on," go back, switch the WLAN switch (located on the bottom-left side of your PSP) into the on position, and try again. If you get a message that your wireless access point is not available, check to make sure that your wireless network is running and configured properly and try again.

Once you have the default page loaded, use the directional keypad to select Downloads and hit the X button. A new page will load with a set of PSP download terms and conditions. Use the directional keypad to highlight Accept and hit the X button. A list of available downloads will appear. Highlight the download you want to grab and hit the X button. A more detailed description of the download will appear. Again, use the directional keypad to navigate to the actual download and hit the X button. An overlay progress bar will appear and the download will begin.

Once you are finished using the browser for its default purposes, simply hit the Start button and select Quit to return to Wipeout Pure's main menu.

Now that you've checked out the browser for its intended purposes, you should trick it into doing some real web surfing.

The story behind this tips


Shortly after the PSP's North American release, several people noticed that there was a very basic browser built into Wipeout Pure, accessible via the main menu of the game. When you click on Downloads in this menu, the game attempts to connect to the Internet and access a page that allows you to download new skins and racetracks for the game.

Several people decided to run a scan while this connection was going on and discovered that Wipeout Pure's browser was attempting to reach out to http://ingame.scea.com/wipeout/index.html. Setting up a little simple DNS redirection taking any requests for http://ingame.scea.com and redirecting them to another server hosting a /wipeout/index.html file was the next logical step. Fill that index.html file with a few of your favorite links, and suddenly the entire Internet is available to you via your PSP.

If you try to load http://ingame.scea.com/wipeout/index.html in your regular web browser on your computer, you will receive a page warning you that you are forbidden to access that page. You could try hacking the user agent identification in your browser to mimic the PSP's browser, but just load it in the PSP if you really want to see it.

PSP Web browser

Your PSP has built-in 802.11b wireless capabilities. High-speed, portable Internet access is literally at your fingertips.

The first section of this tips shows everyone with Version 1.01.52 of the firmware how to access the browser in Wipeout Pure for its intended use, and points you to the basics of redirecting the browser to one of the several PSP-designed web portals that open up these browsers to the full Internet, as well as many of the other hacks covered in this book.

If you are running Version 2.0 of the firmware, skip ahead to the Version 2.0 section to learn all the ins and outs of your browser.

Version 1.x Firmware
This introductory tips is going to point you to a few of the existing PSP web portals you can find online, and show you the basics of tricking your PSP into letting you surf the Internet via an embedded browser in Wipeout Pure. Here's what you'll need:
  • A PSP
  • A copy of Wipeout Pure (supposedly, a Japanese game, Derby Time, also features a built-in web browser and could be used for this hack; I haven't tested this)
  • An accessible wireless (802.11b/g) access pointck
  • An active Internet connection (broadband preferred, if not completely necessary)

Monday, May 19, 2008

Gameboy and Gameboy Color Emulator for PSP


Play thousands of free Gameboy and Gameboy Color games inside your PSP.
Download here

SNES emulator for PSP


Play SNES games in your PSP, you can potentially play hundreds of free SNES games for free!
Download here

NES emulator for PSP


Play classic NES games in your PSP
Download here

Wednesday, May 14, 2008

Homebrew games and emulators


In addition to the homebrew games such as PSP Chess and PSP Go, there are various programs copied from other games, in particular a Bejeweled clone and games such as Dr. Mario. Perhaps one of the most popular forms of homebrew that has the largest following and has persuaded many PSP owners to diligently avoid upgrading their firmware can be found in the form of homebrew emulators that emulate the behavior of other gaming systems.

Since its initial release, the PSP has become one of the best and most versatile emulation platforms available. There are PSP emulators for the Super Nintendo, Nintendo 64, Sega Genesis, Atari Lynx, and a variety of other platforms. There's even a MAME emulator for the PSP. Many of these are available bundled together in packs, such as the Kxsploit Homebrew Pack.

All of these emulators need ROMs to run. You can obtain many excellent homebrew ROMs for a variety of systems at http://www.pdroms.de/.

PSP Rhythm Composer and DJSP


The musically inclined amongst you will like PSP Rhythm Composer (http://www.iturzaeta.com/PSPRhythm/). This homebrew drum machine for your PSP features a 16-step sequencer, 16 drum instruments with 32 total samples, 16 drum patterns, and a song mode.

If you enjoy listening more than creating, you might prefer DJSP (visit http://www.handango.com/PlatformProductDetail.jsp?siteId=1&platformId=14&N=4294925759&productId=175143&R=175143) over the MP3 player that comes preloaded in your PSP.

This Audio Visual MP3 player for the PSP features 10 different visual patterns that play along with your music, a 10-band equalizer that will allow you to increase the volume beyond the loudest volume allowed by the PSP's default MP3 player, and the ability to play tracks of any file length (according to the web site, up to 2 GB, if necessary).

PSP Chess


Christopher Bowron is one of the first and most diligent homebrew developers, releasing PSP Chess (http://bace.bowron.us/) and continuing to improve and update the program over time. It's a really nifty and well-designed chess program that I play regularly on my PSP

Friday, May 9, 2008

Where to find PSP homebrew and emulation applications?


So, now that you know how to both prepare the homebrew applications and get them onto your PSP, all you need to do is to find some homebrew to play. A comprehensive list of the ever-changing landscape of homebrew for the PSP is beyond the scope of this hack. Such an endeavor would be an entire book of its own, and a book that probably shouldn't be written for a while longer, as the scene keeps popping up with new apps and sometimes daily improvements of existing applications.

In the meantime, let's spend some time looking at some online sites where you can grab some of the latest homebrew.

At the risk of being self-promotional, I'll first direct you to the PSP category of my blog, Sample the Web (http://www.sampletheweb.com/categories/media/psp/), where I keep track of a lot of the little PSP bits that interest me. You should also check out PSP Fanboy, a PSP blog that I write for, and PSP Hacks: The Book (http://www.psphacksthebook.com/), a site thatas I write thisis nothing but a placeholder online, but which I intend to populate with lots of useful links and information to enhance this book. Also, make sure you check O'Reilly's web site page for this book (http://www.oreilly.com/catalog/psphks), as we'll be providing corrections to the book from time to time.

None of these sites, however, are hosting the various homebrew applications that you want to get your hands on. There are two places that I've found to be the best repositories for PSP homebrew. One is PSP Updates (http://www.pspupdates.com/).

Unfortunately, for the most part, PSP Updates is hidden behind multiple pop-up- and pop-over-plagued pages that can be more than a bit frustrating at times. The content is both great and free, but if you don't like sites that continually bombard you with advertisements, you may want to consider signing up for a paid account with PSP Updates so that you can browse their files ad-free.

I like free, however, so I'll just continually close the ad windows and click the Skip This Ad links to get to the goods, and diligently empty my browser's cache files after I'm done.

The other, less ad-laden site is PSP-Hacks (http://www.psp-hacks.com/), which has an easily accessible Homebrew Download section (http://www.psp-hacks.com/downloads.php#homebrew), although not as comprehensive as PSP Updates' selection.

Here's a short list of other useful PSP- and homebrew-related links:

PSPworld (http://www.pspworld.com/)
PSP-vault (http://www.psp-vault.com/)
PSP Garden (http://www.pspgarden.com/)
PSP Spot (http://www.psp-spot.com/)
PSP Hacks (http://www.psphacks.net/)
If I don't have direct links to any of the homebrew applications I list in this hack, it's because the developer doesn't have a web site of his own, and the file is found regularly updated on one of these sites. Wherever possible, however, I will link directly to the developer's site.

Split your EBOOT.PBP files


Most newer homebrew apps come in both Version 1.0 EBOOT.PBP format and in split 1.50 format, but in case you run across a homebrew application that is only ready to run on Version 1.0 firmware, there are a few tools available to help you properly prepare the file for running on your PSP.

If you are running Mac OS X, you will want to grab HomebrewPSP Converter (http://ipsp.kaisakura.com/homebrew.php), which is available for free from RnSKSoftronics, the makers of iPSP. This easy-to-use application will let you select a recently downloaded EBOOT.PBP file, split the file into the necessary two parts, and automatically copy these files to a mounted PSP when you click the Transfer To PSP button.

If you're running Windows XP, there are several programs that will do the same thing that HomebrewPSP Converter does on OS X. PSP Homebrew 9 (http://www.pspvideo9.com/homebrew/), from the makers of PSP Video 9, is a free (although donations are welcomed by the developer, Sajeeth Cherian) Windows solution for converting and moving your homebrew applications to your PSP on a Windows box.

In most cases, you won't need to worry about this. Most homebrew applications out there come preprepared in both firmware 1.0- and 1.5-savvy versions, so there is really not much need for converting the files anymore. I only supply the information here for the rare file that isn't pre-prepared, and to provide some of the history behind the scene.

PSP Homebrew and Emulators


If you were one of the fortunate few who grabbed a Japanese PSP running Version 1.0 of the firmware, then you have a very nice homebrew machine at your fingertips. There are multiple sites online that serve as repositories for these homebrew applications, where you can download them and then transfer them to the GAMES folder inside the PSP folder on your Memory Stick. After you copy the homebrew applications and games to this folder, navigate to Games Memory Stick on your PSP, hit the X button, and then select the homebrew game or application you want to play from the list and hit the X button again to launch it.

Keep in mind that all these homebrew apps take up space on your Memory Stick. Make sure you watch sites such as dealnews (http://www.dealnews.com) to try to get a 1GB or larger Memory Stick Duo card on the cheap.

If you, like most people who purchased their PSP in North America, have Version 1.5 of the firmware on your PSP, then things are only slightly trickier. Originally, the first workaround for running homebrew on Version 1.50 of the firmware involved something called a swaploit. For the swaploit, the EBOOT.PBP file that contains the main code for each homebrew program had to be split into two parts, placed into two identical folders inside /PSP/GAMES/ on two different Memory Sticks. You would navigate to the game on the first Memory Stick and hit the X button, then immediately after the PSP flash screen appeared, indicating that the game was launching, you had to quickly eject that first Memory Stick and replace it with the second one. If you timed everything just right, the game or homebrew application would successfully launch.

This swaploit was far from ideal, as the swapping required speed and skill and wasn't very good for the Memory Sticks involved, whichover timewould develop scratches on their contacts (and could also at times be damaged or possibly lost from accidentally shooting them across the room while ejecting them to make way for the second Memory Stick).

Fortunately, another workaround was discovered that eliminated the need to swap the Memory Sticks. Again, the EBOOT.PBP file was split in two, but this time, both files were placed on the same Memory Stick inside two different folders. Each folder had the same name, with the first ending with an additional % at the end of the name. When navigating through the Memory Stick via the PSP's Game menu, each homebrew game or application would show up next to another file called Corrupted Data. This file was merely the second folder that didn't appear launchable to the PSP.

Monday, May 5, 2008

Official Sony headset comes to PSP for VoIP

Tokyo (Japan) - Sony Computer Entertainment Japan has announced a PlayStation Portable Headset with Remote Control bundle for the PSP Slim (PSP-2000).

The remote control in this bundle features a black colored face to match the black on the PSP headset. It will be available in Japan for 3,800 yen starting June 19, 2008.

The good news is the PSP Headset bundle is listed to ship in the US next week, according to this product listing on Amazon.com. The bundle eliminates the need to buy the Sony PSP Headset (MSRP $19.99) and the PSP 2000 Remote Control (MSRP $29.99) separately to use it with the PSP's Skype, saving you $20.

How to know your PSP firmware version?

Here's how to make sure you're getting the PSP you really need.

Out of the box
If you have your PSP in your hands, it's pretty easy to find out which firmware you are running. Simply navigate to Settings System Settings, hit the X button, then scroll down to System Information and hit the X button again. An informational screen will pop up listing your PSP's MAC address, the System Software, and your PSP's nickname. Whatever number follows Version in the System Software row is the version of the firmware you are running.

In the box
If you don't have your PSP yet, or you're in the market for a second one, here's what you need to know to try to avoid grabbing another Version 2.0. The UPC sticker on one end of the box indicates the firmware version. There are two boxes, one without an A under 120V, indicating Version 1.5 boxed with the Spider-Man 2 UMD, and one with an A, indicating Version 1.5 of the firmware without the free UMD. If the box says something other than PSP-1001 K along the top, or it has a B or any other letter than an A underneath the 120V, then you're dealing with 1.51, 1.52, or 2.0 firmware, and you won't be able to run the homebrew.

Run Homebrewed Software in your PSP

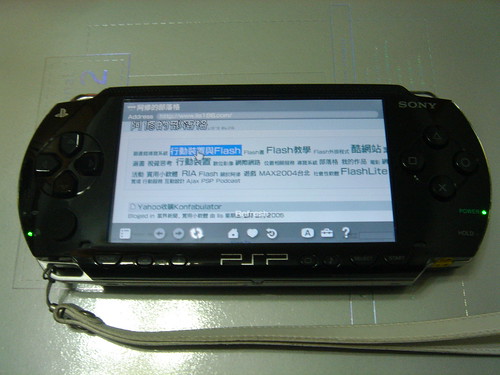
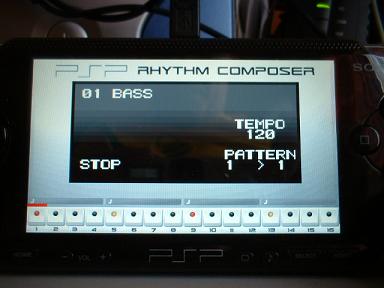
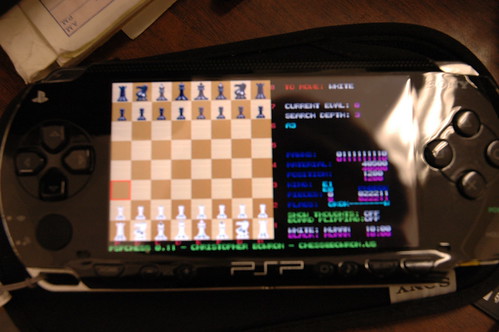
One of the great things about the PSP as a gaming system is the large number of developers and hackers who flocked together to figure out ways to really trick out the system with their own homebrew applications.

If you have a PSP running Version 1.0 or 1.5 of the firmware, don't update to Version 2.0 of the firmware.

If you have a PSP running 1.51 or 1.52 of the firmware, then you might as well go ahead and upgrade to 2.0. Why? Well, all the dutiful hackers have figured out ways of running their own code on PSPs running Versions 1.0 and 1.5 of the firmware. They haven't figured out how to get around the clamps Sony slapped on Versions 1.51, 1.52, or 2.0…at least, not as of this writing.

If you buy a game that requires you to update to 1.51, 1.52, or 2.0, try grabbing WAB Version Changer (http://www.psphacks.net/content/view/344), which will trick the game into thinking you are running a newer version of the firmware and do so without ruining your homebrew. Keep your eyes on the WAB team too, as they are working on a downgrader to help everyone who has already updated their PSPs.

So, if you're running Version 1.0 or 1.5 of the firmware, an entire world of programs and emulators are available to you. If you're running Version 2.0, then you can still run browser-based JavaScript homebrew, but no native code and no emulators. Again, I think this will prove to be a "yet" situation. There are people working right now on breaking the locks Sony has put in the way of all the homebrew. If you're daring, you can try downgrading your firmware.

Feel free to skip ahead to the section that covers your firmware. Not sure what you have? Have you already bought a PSP running Version 2.0, but want to sell it on eBay to buy one running Version 1.5 of the firmware? Read on to find out how to spot a 1.5 PSP among a stack of 2.0s.

Saturday, May 3, 2008

PSP GUIDE - Syphon Filter: Dark Mirror

Unlockables

Destroy DU containers in episode 4

In missions 4-1, 4-2, and 4-3, there will be 5 DU containers scattered about each level. Shoot each one to unlock weapons for use in Mission Mode.

UnlockableHow to Unlock
M1 Super 90 in Mission ModeDestroy 5 DU containers in 4-1
M16A2 in Mission ModeDestroy 5 DU containers in 4-2
M4 Carbine in Mission ModeDestroy 5 DU containers in 4-3

Contributed By: King_Lueshi

Increased Melee Damage

Only available online. Increases your damage done by melee moves such as kicking and elbowing.

UnlockableHow to Unlock
Increased melee damageGet the first hand-to-hand combat medal

Contributed By: blitzofchaos

Multiplayer Weapons

Each time you rank up or obtain certain badges in multiplayer, you unlock new weapons. These weapons are unlocked for MULTIPLAYER use only. Guns are listed in order, Team 1 weapons first and Team 2 weapons second.

UnlockableHow to Unlock
33 SC-1 and SG-76 H-Bar (Snipers)Achieve rank R2
AR-15 and Draugonov (Snipers)Achieve rank T2
Claymore MinesEarn Expert Gadget Expertise Badge
Desert Sniper .357 and SP-57 (Pistols)Achieve rank O3
Double Sawn-Offs (Pistol)Earn Elite One-handed skill badge
EMP GrenadesEarn Expert Explosive Expertise Badge
EPDDEarn Elite Hand to Hand Combat Badge
G-17 and Makarov (Pistols)Start a new account (R0)
Laser MinesEarn Elite Gadget Expertise Badge
M16 A2 and Famas(ARs, burst fire)Start a new account (R0)
M16K and Galil (ARs, Full Auto)Achieve rank O2
M60 E-3 and Chinese Type-56 (HMGs)Achieve rank O1
M67 GrenadesEarn Elite Explosive Expertise Badge
MDS A3 and Spectre (Full Auto SMGs)Achieve rank R1
MDS-7 and Ripper (SMGs in pistol slot)Achieve rank T1
Shot Defender and SPA-12 (Shotguns)Achieve rank R3
Trip Bar and Ramat (HMGs/ARs)Achieve rank T3
USAS-12 and Sawed Off (Shotguns)Achieve rank 04

Contributed By: Comrade_27

Online Badges

Here are ways to earn/unlock badges while playing online Multiplayer.

UnlockableHow to Unlock
Ammo ExpertiseExpert: Around 250 Headshots; Elite: around 500 Headshots
Armor ExpertiseExpert and Elite badges are earned by finding Flak Jackets.
Explosive ExpertiseExpert: Around 200 Exp. kills(MGL, SMAW or M67) Elite: 500 Exp. kills
Field MedicExpert and Elite: HEAL!!!! Just keep on Healing!
Gadget ExpertiseExpert and Elite: Get Kills with Taser, Laser Mines, Claymores
Hand-To-HandExpert: Around 30 Melee kills; Elite: Around 50 Melee Kills
One Handed SkillExpert: Around 250 Single Handed Guns(pistols) Elite: Around 500 Single Handed Guns{Shotguns might possibly count}
TriageExpert: Around 100 Revives; Elite: Around 200; WARNING: YOU MUST KEEP REVIVING OR ELSE THERES A CHANCE OF YOU LOSING IT!!

Contributed By: crazycrawler

Training Rewards

From the main menu select single player. Then select training mode. Then chose the training level you wish to try.

UnlockableHow to Unlock
FamasComplete the second training mission in under 3 minutes
SP-57Training Mission 1: Complete this mission in under 1 minute and 35 seconds
UNP .45Training Mission 3: Complete this mission without wasting a shot.

Contributed By: Eminem9, Red_aka_madfrog

Unlock AK-47 for use in Mission Mode

UnlockableHow to Unlock
AK-47Complete the "headshots" goal in mission 6-1

Contributed By: King_Lueshi

Unlock the M4 Silenced for use in Mission Mode

UnlockableHow to Unlock
M4 SilencedGet 10 headshots on hard difficulty in mission 7-1

Contributed By: King_Lueshi

Unlock The Rocket Launcher For Use In Mission Mode

UnlockableHow to Unlock
SMAWShoot All The Small Warheads In 4-3

Contributed By: daBIONICredneck

Unlockable Bonus Missions

Complete certain tasks to unlock 5 different bonus missions.

UnlockableHow to Unlock
Birds of a FeatherFinish Story Mode on Normal or Hard
Goodnight, SweetheartBeat all the time limits in the Training Missions
Jimmy Zhou's ArmyFinish "Birds of a Feather"
Trapped In The Hornets NestObtain all patches for "Combat Sharp Shooter"
Up a Column Without a PaddleObtain all patches for "Elite Weapons Expert"

Contributed By: TheBoss815

Unlockables in the Bonus Missions

UnlockableHow to Unlock
M249 SAWBeat KemSynth Tower in less than 2:42
Shot DefenderBeat Sana Yemen in less than 3:39

Contributed By: AlucardZero

PSP Cheat - Tekken 2

Codes

Choose Victory Animation

After winning a round and you see the replay showing, pressing each button( [X], [O], etc...) will result in a different victory animation. This also works when the opponent wins.

Contributed By: red soul

Fight as Kazuya in purple suit

Highlight Kazuya and press start button.

Contributed By: CJ800

Misc. Codes

CodeEffect
In arcade mode while selecting your character hold Select and press XBig Characters
Hold the select button while choosing your character, continue holding it until the match beginsBig Head Mode
Highlight Roger and Press SquareFight as Alex
Beat Devil using Kazuya, then select your fighter by pressing the Kick buttonFight as Angel
Beat Devil using Kazuya, then select your fighter using the Punch buttonFight as Devil
Highlight Roger and press TrianglePick Roger in one player mode
Different ColorsPress start when choosing a character.
Unlock all characters, then hold Select + Up when choosing a character. Keep holding them until the fight begins.Sky Mode
Unlock all characters, then hold L2 + L1 while selecting your character. Keep holding them until the match begins.Wire frame mode

Contributed By: Nutsman, dinobotmaximized, D Generate, Mike Truitt, Mr Grimm, ofirissmart, KasketDarkfyre, alex cross

Plump size character

Press and hold the select button before the "VS" screen appears. Continue to hold the button until the match begins and your character will turn fat. If you do this trick again, your character will be even fatter in the next match.

Contributed By: CJ800

Unlockables

Misc. Unlockables

UnlockableHow to Unlock
AnnaBeat the game with Nina
Armor KingBeat the game with King
BaekBeat arcade mode with Law
BruceBeat Arcade Mode with Lei
GanryuBeat the game with Michelle
KazuyaBeat Devil using any sub-boss.
KumaBeat arcade mode with Paul
KunimitsuBeat arcade mode with Yoshimitsu
LeeBeat arcade mode with Heihachi
P. JackBeat arcade mode with Jack 2
Roger and AlexOn stage 3 win the last round with 5% energy or less left
Wang JinreyBeat the game with Jun

Contributed By: Mr Malone, JPeeples, Undertaker Powerbomb, ROCK1990, Mike Truitt, SJK

New Title Screen

UnlockableHow to Unlock
New Title Screen (Kazuya's Face)Unlock all Sub Bosses including Alex and Roger

Contributed By: MGRaiden

Easter Eggs

Hidden Music tracks

Put the game disk in a CD Player. The disk will have 3 tracks on it; tracks 1 and 3 are just be really long tracks that don't play anything, but the second is a hidden music track.

Contributed By: XStationCube

PSP Cheat - Grand Theft Auto (GTA): LIBERTY CITY STORIES

Codes

Codes

Enter these during gameplay

CodeEffect
UP, UP, UP, SQUARE, SQUARE, TRIANGLE, R1, L12 Gangs+14 Characters (Multiplayer)
UP, UP, UP, CIRCLE, CIRCLE, X, L1, R14 Gangs+28 Characters (Multiplayer)
UP, UP, UP, X, X, SQUARE, R1, L17 Gangs+43 Characters (Multiplayrer)
SQUARE, SQUARE, R1, X, X, L1, CIRCLE, CIRCLEAggressive Drivers
TRIANGLE, TRIANGLE, R1, SQUARE, SQUARE, L1, X, XAll Green Lights
TRIANGLE, R1, L1, DOWN, DOWN, R1, R1, TRIANGLEAll Vehicles Chrome Plated
CIRCLE, CIRCLE, R1, TRIANGLE, TRIANGLE, L1, SQUARE, SQUAREBlack Cars
DOWN, DOWN, DOWN, CIRCLE, CIRCLE, X, L1, R1Bobble Head World
X, Square, Down, X, Square, Up, R1, R1Calls closest Ped to come hop on/in your vehicle.
CIRCLE, X, DOWN, CIRCLE, X, UP, L1, L1Cars Drive On Water
CIRCLE, RIGHT, X, UP, RIGHT, X, L1, SQUAREChange Bike Tire Size
UP, DOWN, CIRCLE, UP, DOWN, SQUARE, L1, R1Clear Weather
L1, DOWN, LEFT, R1, X, CIRCLE, UP, TRIANGLECommit Suicide
L1, L1, LEFT, L1, L1, RIGHT, X, SQUAREDestroy All Cars
L1, R1, L1, R1, UP, DOWN, L1, R1Display Game Credits
L1, L1, LEFT, L1, L1, RIGHT, CIRCLE, XFaster Clock
R1, R1, L1, R1, R1, L1, DOWN, XFaster Gameplay
UP, DOWN, TRIANGLE, UP, DOWN, X, L1, R1Foggy Weather
L1, R1, CIRCLE, L1, R1, X, L1, R1Full Armor (Blue Bar)
L1, R1, X, L1, R1, SQUARE, L1, R1Full Health (Red Bar)
DOWN, DOWN, DOWN, TRIANGLE, TRIANGLE, CIRCLE, L1, R1Have People Follow You
L1, R1, TRIANGLE, L1, R1, CIRCLE, L1, R1Money Cheat ($250,000)
L1, L1, TRIANGLE, R1, R1, X, SQUARE, CIRCLENever Wanted
UP, DOWN, X, UP, DOWN, TRIANGLE, L1, R1Overcast Weather
L1, L1, R1, L1, L1, R1, UP, TRIANGLEPeds Attack You
R1, R1, L1, R1, R1, L1, RIGHT, CIRCLEPeds Have Weapons
L1, L1, R1, L1, L1, R1, LEFT, SQUAREPeds Riot
L1, UP, LEFT, R1, TRIANGLE, CIRCLE, DOWN, XPerfect Traction
UP, DOWN, SQUARE, UP, DOWN, CIRCLE, L1, R1Rainy Weather
L1, UP, RIGHT, R1, TRIANGLE, SQUARE, DOWN, XRaise Media Attention
L1, R1, SQUARE, L1, R1, TRIANGLE, L1, R1Raise Wanted Level
L1, L1, LEFT, L1, L1, RIGHT, SQUARE, TRIANGLERandom Ped Outfit
R1, TRIANGLE, X, R1, SQUARE, CIRCLE, LEFT, RIGHTSlower Gameplay
L1, L1, LEFT, L1, L1, RIGHT, TRIANGLE, CIRCLESpawn Rhino
TRIANGLE, CIRCLE, DOWN, TRIANGLE, CIRCLE, UP, L1, L1Spawn Trashmaster
L1, L1, CIRCLE, R1, R1, SQUARE, TRIANGLE, XSunny Weather
UP, UP, UP, TRIANGLE, TRIANGLE, CIRCLE, L1, R1Unlock multiplayer skins
DOWN, DOWN, DOWN, X, X, SQUARE, R1, L1Upside Down Gameplay
X, X, X, DOWN, DOWN, RIGHT, L1, R1Upside Down Gameplay2
Triangle, Triangle, Triangle, Up, Up, Right, L, RUpside Up
UP, SQUARE, SQUARE, DOWN, LEFT, SQUARE, SQUARE, RIGHTWeapon set 1
UP, CIRCLE, CIRCLE, DOWN, LEFT, CIRCLE, CIRCLE, RIGHTWeapon set 2
UP, X, X, DOWN, LEFT, X, X, RIGHTWeapon set 3
X, X, R1, CIRCLE, CIRCLE, L1, TRIANGLE, TRIANGLEWhite Cars

Contributed By: LilPros, iNtHEmIND, MRG, sawtoothsquid, The_PSP_Playa, Zack_99932, MorpheusDV, darkflames0, achocoolcho, zaydenblack, Swan3624, msz070

Unlockables

Hidden Package Rewards

Find the hidden packages.

UnlockableHow to Unlock
Generate a armour at all safe houses030 Packages
Generate a flamethrower at all safe houses080 Packages
Generate a M4 at all safe houses060 Packages
Generate a MP5 at all safe houses040 Packages
Generate a python at all safe houses050 Packages
Generate a rocketlauncher at all safe houses090 Packages
Generate a shotgun at all safe houses020 Packages
Generate a sniper rifle at all safe houses070 Packages
Gives you $50,000100 Packages
Pistol at Safehouse010 Packages

Contributed By: getLifted, J_Fox

Mission Unlockables

UnlockableHow to Unlock
Antonio OutfitComplete the mission "Making Toni".
'King' Jumpsuit CostumeFinsh all story mode missions
150 Max Armor PointsComplete Level 12 In Vigilante Missions
Avenging Angel's OutfitComplete the Frighteners mission
Bickle '76Drop off 100 Passengers in the Taxi
Bullet Proof PCJ 600Take Waynes Bike in Biker Heat Mission.
Chauffer's OutfitComplete the Rollercoaster Ride mission
Cox Mascot OutfitBeat SlashTV 2 times
Dragon Jump Suitcomplete the mission "Crazy '69'
Extra 25 Max Health PointsComplete Level 10 in Noodle Delivery Missions at Noodle Punk in Portland
Extra 25 Max Health PointsComplete Level 10 in Pizza Deliveriy Missions at Joe's Pizza in Staunton Island
Fireproof ToniComplete Level 12 In Firefighter Missions
Generate $4000 at Capital AutosBeat Level 6 of Car Salesman
Generate 4x the cash for cars in the ScrapyardComplete the Scrapyard motorcycle challenge
Generate a boat Speeder at Portland Ferry DocksBeat the game 100%
Generate cash from "Hogs & Cogs"Sell 40 motorcycles in Belleville Park, Staunton Island
Get 10000$Complete all 26 unique jumps
Getting Busted Won't Cost MoneyCompleting Avenging Angels missions in Staunton Island
Goodfella OutfitComplete the mission "Overdose of Trouble".
Hellenbach GTBeat level four of the car salesman sidequest
Hero CostumeBeat Level 15 of the Avenging Angels missions in Shoreside Vale
Infinite AmmoBeat the game 100%
Infinite SprintBeat Ambulance Missions Level 12
Leone's OutfitDrive to your house at the start of the game and walk into the clothes icon
M60 machine gunBeat all rampages.
Micro SMG able to be purchased at Ammu-NationComplete the Don in 60 seconds mission
Multiplayer SkinsComplete the "Driving Mr Leone" mission.
Overalls OutfitComplete the The Portland Chainsaw Masquerade mission
PCJComplete Love Media
Rhino Tank in Ft. StauntonComplete the game 100%
Super Angel Bike (Bulletproof) generated at Portland safe-houseCompleting Avenging Angels missions in Portland
Super Land Stalker (Bulletproof) generated at Shoreside Vale safe-houseCompleting Tourism missions
Sweats OutfitComplete the mission "A Walk In The Park".
Tuxedo OutfitComplete the mission "A Date with Death".
Underwear costumeComplete 1 Unique Jump
Upgraded SanchezComplete all ten courses in the "Bump & Grinds" at the dirt bike course in Portland
V8 GhostComplete Love Media
Vehicles Take Double DamageComplete the game 100%
Wise Guy clothescomplete mission "shoot the messenger"

Contributed By: AleeN634, Tony Cipriani, Stan Hansen, esn, XCommander, getLifted, din_drum, accordtypek, kumatoast, Funtastik, unklmeat, tacklebeast, AC_Blaze, jeroendendulk, Dmndrgn, Giovone, ZOLTRIX, mast3rdisaster, LAPD 85, Bendilin, flamefilms, Klaydoggy, TechnoMancer

Easter Eggs

Moon Increases in Size

When it's night-time, take out your Sniper Rifle and look for the Moon in the sky. Zoom in and shoot the Moon. The Moon will increase in size the more you shoot it and then go back to it's original small state when you shot it enough times.

Contributed By: MorpheusDV

Smiley face

On Statunton Island there is a parking lot on the top southwest corner. Look for a white staircase inbetween the parking garage and the parking lot entraces on the southside. Go up the staircase and jump on the short cement railing. Then turn east and jump up on the roof over looking the parking lot (Liberty City Tree Building) and run across the roof to the other side where you will see a courtyard. Jump down into the courtyard and run to the very end of the courtyard to the northwest. Then on a wall at the end of a courtyard has a white picture of a smiley face and says 'Hello Again'. This is the same spot where in Grand Theft Auto III, where a sign says "You arn't supposed to be here."

Contributed By: LAPD 85

Glitches

Double Ammunition

It is possible to duplicate any amount of ammunition for a specific gun. This happens during any missions or odd jobs where you are driven by someone and have to shoot things with a crosshair and some type of automatic gun with unlimited ammo. Just have the gun in your inventory that you want to duplicate ammo selected before you start the mission or odd job. Certain missions where there is more than just the shooting part only require having the gun selected when you go into the shooting part of the mission. When the mission is completed or failed you should notice the selected gun has twice the initial ammo.

Contributed By: Hotsuma_Son

Infinite Time for Fires in Fire Truck Missions

To exploit this glitch it's just a matter of putting the fire out as the clock is going to hit 0. If done correctly, the timer will disappear allowing infinite time to cruise to the next fire.

Contributed By: BoyHorror

Keep more than one vehicle in your garage.

Normaly you can only keep one vehicle in your garage due to the fact that if one vehicle is being stored the door will not open for the one your in, so get out of your car (a bike works easier) and push it next to the garage doors, when you get close enough it will open and let you push your vehicle into the garage. This is very handy when you want both a car and a bike at your fingertips.

Contributed By: kts123

Near Infinite Sprint Trick

Just tap default X button to sprint instead of holding it down. You cycle the sprint so it's like you never start. This can be done at any time; whether during a mission or exploration.

Contributed By: Hotsuma_Son

Repair a burning car

If your car catches on fire, you can revert it to the state it was before it caught on fire by walking into one of the Information icons in front of a hospital of police station. After the information is displayed, your car is (almost) like new.

Contributed By: HTGreyFox

Secrets

Bullet proof PCJ-600

In the mission "Biker Heat", when you chase down Wayne, kill him WHILE HE'S ON THE BIKE (he cannot fall off the bike or it will not be bullet-proof anymore), steal it, and then save it for a bullet-proof PCJ.

Contributed By: chuckflip53

Bulletproof Stretch

You must be on Staunton Island and on the mission "Search and Rescue" which is given to you by Sal over the pay phone. Go pick up the limo from Sal's garage, then drive the limo to YOUR garage. Do NOT go to the yellow marker. Go straight from the Sal's garage to yours. After the limo is in your garage, fail the mission (die or blow up the limo while it is in your garage) and then the Bulletproof Stretch is yours. This works with other mission vehicles as well.

Contributed By: DavidKakish

Rampage without getting wanted

Start a new game. Instead of taking Vincenzo to the Safe House, leave him in the car and don\'t get in. Now you can roam free and do whatever you want without getting any stars at all!

Contributed By: smegax

PSP Cheat - Brothers in Arms D-Day

Level Select

Type this as your profile name.

PasswordEffect
JUNESIXLevel Select unlocked

Contributed By: EvilZ123456

PSP Cheat - Grand Theft Auto (GTA): Vice City Stories

Codes

Codes

Enter These During Gameplay

CodeEffect
UP, UP, UP, TRIANGLE, TRIANGLE, CIRCLE, L, R100% of MP Content
UP, UP, UP, SQUARE, SQUARE, TRIANGLE, R, L25% of MP Content
UP, UP, UP, CIRCLE, CIRCLE, X, L, R50% of MP Content
UP, UP, UP, X, X, SQUARE, R, L75% of MP Content
L1, R1, L1, R1, LEFT, CIRCLE, UP, XAll Cars are Black
UP, DOWN, LEFT, RIGHT, SQUARE, SQUARE, L1, R1Armor
UP, UP, RIGHT, LEFT, TRIANGLE, CIRCLE, CIRCLE, SQUARECars avoid you
RIGHT, UP, LEFT, DOWN, TRIANGLE, TRIANGLE, L1, R1Chrome Cars
LEFT, DOWN, R1, L1, RIGHT, UP, LEFT, XClear Weather
RIGHT, RIGHT, CIRCLE, CIRCLE, L1, R1, DOWN, XCommit Suicide
L1, R1, R1, LEFT, RIGHT, SQUARE, DOWN, R1Destroy All Cars
R1, L1, L1, DOWN, UP, X, DOWN, L1Faster Clock
LEFT, LEFT, R1, R1, UP, TRIANGLE, DOWN, XFaster Gameplay
LEFT, DOWN, TRIANGLE, X, RIGHT, UP, LEFT, L1Foggy Weather
UP, DOWN, LEFT, RIGHT, X, X, L1, R1Get $250000
RIGHT, L1, DOWN, L1, CIRCLE, UP, L1, SQUAREGuys Follow You
UP, DOWN, LEFT, RIGHT, CIRCLE, CIRCLE, L1, R1Health
UP,RIGHT,TRIANGLE,TRIANGLE,DOWN,LEFT,X,XLOWER WANTED LEVEL
DOWN, UP, RIGHT, L1, L1, SQUARE, UP, L1Nearest Ped Gets in Your Vehicle (Only works when inside of vehicle)
LEFT, DOWN, L1, R1, RIGHT, UP, LEFT, SQUAREOvercast Weather
DOWN, TRIANGLE, UP, X, L1, R1, L1, R1Peds Attack You
UP, L1, DOWN, R1, LEFT, CIRCLE, RIGHT, TRIANGLEPeds Have Weapons
R1, L1, L1, DOWN, LEFT, CIRCLE, DOWN, L1Peds Riot
DOWN, LEFT, UP, L1, R1, TRIANGLE, CIRCLE, XPerfect Traction (Press down to 'jump' in cars)
LEFT, DOWN, L1, R1, RIGHT, UP, LEFT, TRIANGLERainy Weather
UP, RIGHT, SQUARE, SQUARE, DOWN, LEFT, CIRCLE, CIRCLERaise Wanted Level
LEFT, LEFT, CIRCLE, CIRCLE, DOWN, UP, TRIANGLE, XSlower Gameplay
UP, L1, DOWN, R1, LEFT, L1, RIGHT, R1Spawn Rhino
DOWN, UP, RIGHT, TRIANGLE, L1, TRIANGLE, L1, TRIANGLESpawn Trashmaster
LEFT, DOWN, R1, L1, RIGHT, UP, LEFT, CIRCLESunny Weather
SQUARE, SQUARE, SQUARE, L1, L1, R1, LEFT, RIGHTUpside Down Mode 1
LEFT, LEFT, LEFT, R1, R1, L1, RIGHT, LEFTUpside Down Mode 2
LEFT, RIGHT, X, UP, DOWN, SQUARE, LEFT, RIGHTWeapon Set 1
LEFT, RIGHT, SQUARE, UP, DOWN, TRIANGLE, LEFT, RIGHTWeapon Set 2
LEFT, RIGHT, TRIANGLE, UP, DOWN, CIRCLE, LEFT, RIGHTWeapon Set 3

Contributed By: Marshy, NarooN, ZOLTRIX, dmercier, shauty123

Unlockables

Discount Prices at Ammu-Nation Gun Stories

To get discount prices at Ammi-Nation gun stores, complete the shooting range challenges at the Vice City Docks, outside Phil's place.

Contributed By: Probester

Mission Unlockables

Side mission unlockables

UnlockableHow to Unlock
Bulletproof Business VehiclesConquer all 30 businesses
Extra ArmorComplete 15 Levels of Vigilante Sidemissions
FireproofFinish 15 levels in the fire engine 'firefighter' missions
Free Pay "N" Spray UsageDeliver all 32 cars to the Civil Asset Forfeiture Impound Yard
Infinite SprintComplete 15 levels during the ambulance 'paramedic' missions
Max Health IncreaseComplete 15 levels in the air ambulance
Never get tired while swimmingComplete 15 levels of beach patrol
Taxi JumpComplete either 50 fares or earn $5000 in fares

Contributed By: Domino900, tc811, GeneralCortez, AsherDG, luke734, rdrcr420

Rewards for finding hidden balloons

Find and pop hidden balloons to unlock weapons at your safe house.

UnlockableHow to Unlock
AK-4750 Balloons
Armor60 Balloons
Equalizer (Pistol with scope)80 balloons
Flamethrower70 balloons
M249 machine gun99 balloons
Molotov Cocktails40 Balloons
Pistol10 balloons
Scorpion (SMG)20 balloons
Sniper Rifle90 balloons
Stubby Shotgun30 balloons

Contributed By: admoUNIVERSAL, Ollie The Magic Bum, ddrfreak720, LAPD 85, malnourish, simplechords

Unlockable Outfits

UnlockableHow to Unlock
Army FatiguesBeat "Last Stand"
Casual ClothesFinish the mission "Conduct Unbecoming"
Cuban Style ClothesFinish the Umberto Mission Strand
Hired Muscle ClothesBuy a High Roller Protection Racket Empire State
Hood ClothesBuy a "High Roller" robbery building
Leisure OutfitBuy a "High Roller" Prostitution building
Mr. Repo ClothesBuy a "High Roller" loan shark building
Smart SuitComplete every mission for all six of the types of empires.
Smuggler ClothesBuy a "High Roller" smuggling building
Track SuitBuy a "High Roller" drug dealing business
Trailer Trash ClothesComplete the mission "D.I.V.O.R.C.E"
WetsuitComplete all 8 Jetski races using the Jetski at the film studios
Winner's OutfitBeat "Last Stand"

Contributed By: Probester, GeneralCortez, Ollie The Magic Bum, AsherDG, crimsoncielo, ssj7_blade, Domino900

Unlockables for 100% completion

UnlockableHow to Unlock
Ability to watch mission cutscenes in The Clymenus SuiteGet 100% completion
Infinite ammoGet 100% completion

Contributed By: jfissel

Glitches

Infinite Sprint

To be able to sprint for unlimited periods of time, just tap X rapidly instead of holding it down. Your character will never get tired unless you begin holding down X again.

Contributed By: NarooN

PSP GUIDE - Tom Clancy's Ghost Recon Advanced Warfigher 2 Weapons Guide

Written by: David Callander

I recently bought Tom Clancy's Ghost Recon Advanced Warfigher 2 for the PSP.
Although it wasn't quite what I was expecting it turned out to be a decent
game for the price I paid for it. While I am familiar with most of the weapons
in the game, there were times when I couldn't decide on what to use. It was
because of that I have decided to make this guide after finishing the game
at least once.

-------------------
|Table of Contents |
| |
|1) Introduction |
|2) Basic Info |
|3) Handguns |
|4) Assault Rifles |
|5) Sniper Rifles |
|6) Explosives |
|7) Credits |
-------------------

1) Introduction

Welcome to my Tom Clancy's Ghost Recon Advanced Warfigher 2 Weapons Guide.
This is the first guide I have wrote for a "next gen" system, as my previous
other guides have been either for the NES, SNES, or GBA systems. As to this
guide it is not a full walkthrough, just lists the various weaponry that you
can obtain throughout the course of the game. After I finish my current game
which is on "Hard" difficulty and I gain more understanding of it I may
consider a walkthrough. If you have questions or comments about this guide
feel free to email me at: Cal_96@hotmail.com. I get a lot of spam with hotmail
so please make a mention of the game or guide in the subject line so I don't
delete your email thinking it is spam.

While this is not the biggest guide I have made, feel free to post it on your
own website should you wish. All I ask is that you send me an email at the
address above to let me know that you're using it.

2) Basic Info

Throughout the course of the game you'll have a chance to acquire many
different weapons. You can carry at most at any time is a handgun, your primary
weapon, a secondary weapon which can be changed with other weapons, and
grenades. To pick up a new weapon you have one of two choices, you can either
get one from the ammo box, which is shown on your map as a blue triangle, or by
getting one from a dead guard. The guards carry various weapons, usually ones
that can be obtained from the box but not always. Do note that when you get
weapons from the guards, even if it has the option for full auto, sometimes it
is set to single fire only. Also note that you cannot replenish handgun
ammunition or grenades unless you get to an ammo box.

The charts for the weapons will look something like this:

Name: The name of the weapon.
Caliber: This is the caliber of the weapon according to the game.
Fire modes: The type of firing the weapon can do, single shot, full auto etc.
Ammo capacity: This indicates the max each magazine will hold as well as the
most extra you can carry. 30/300 for example indicates 30 per magazine and a
max carry amount of 300.
Zoom mode: This is the type of zoom the weapon has. It can be standard advance
(just tapping the zoom button for a slightly better view), scope standard,
(holding the zoom button until the scope appears but no chance of pushing down
to increase zoom), or scope advance (holding the zoom button until the scope
appears and able to push down to double sight range).
Vehicle damage: This is how much if any the weapon damages vehicles. It can
be either poor, medium or good. There will also be a damage percent inside
parenthesis, estimating how much damage per hit it might cause. Aim at the
diamond and you should see a number from 1 to 100. That is the life of your
target. This will be tested only on jeeps and trucks, as I am pretty sure tanks
and other heavily armored vehicles require explosives to destroy. Aiming at the
windows also seems to be more effective than shooting at the body.

3) Handguns

There are only 2 handguns in the game and should only be used as a last resort.
Their firing circles are small and they don't carry a lot of ammo but they can
kill.

--------------------------------------------------------
|Name: M9 Pistol |
|Caliber: 9x19mm* |
|Fire modes: single shot |
|Ammo capacity: 15/60 |
|Zoom mode: standard advance |
|Vehicle damage: poor (1%) |
--------------------------------------------------------

*: I'm not totally sure on this because you can't get another M9 from the ammo
box. This is the info that is given from the M9SD. Its the same gun except
without a silencer so I can't imagine it being a different caliber.

--------------------------------------------------------
|Name: M9SD Pistol |
|Caliber: 9x19mm |
|Fire modes: single shot |
|Ammo capacity: 15/60 |
|Zoom mode: standard advance |
|Vehicle damage: poor (1%) |
--------------------------------------------------------

As I mentioned before I would stay away from using the handguns as much as
possible. You could always use them should you run out of ammunition for your
two other weapons, or are just looking for a challenge of going through the
game with very limited ammo and stopping power.

4) Assault Rifles

Assault rifles make up the majority of the weapons you'll be using. These all
have high magazine capacities, and loads of extra ammunition. Once you obtain
the M29 OICW to replace your SCAR-L you may want to consider keeping the ZEUS
MPAR as your permanent secondary weapon. The M29 carries an obscene amount of
ammo, plus it has a few types of grenades to use. If the ammo box in a mission
has the ZEUS launcher in it odds are you'll probably need it and it can be time
consuming to run back to the box, change out your secondary weapon and go back
to destroy the vehicle that your M29 can't touch.

--------------------------------------------------------
|Name: SCAR-L |
|Caliber: 5.56x45mm |
|Fire modes: single shot, full auto |
|Ammo capacity: 30/360 |
|Zoom mode: standard advance |
|Vehicle damage: poor (1%) |
--------------------------------------------------------

This is your default primary weapon at the start of the game. You cannot drop
it by collecting two different secondary weapons.

--------------------------------------------------------
|Name: M29 OICW |
|Caliber: 5.56x45mm/20mm |
|Fire modes: single shot, three shot burst, full auto, |
|Fire modes: grenade*, laser designation |
|Ammo capacity: 30/450 |
|Zoom mode: standard advance, zoom advance |
|Vehicle damage: poor (3-4%) |
--------------------------------------------------------

This becomes your primary weapon a few missions into the game. This weapon
is basically an all in one weapon. It carries the most ammo besides the MK21
and MK48, and it has a built in grenade launcher with three different types.
There is even a laser designator to lase targets for an airstrike.

*: See the explosives section below for more information on the grenades.

--------------------------------------------------------
|Name: AKS-47 |
|Caliber: 7.62x39mm |
|Fire modes: single shot, full auto |
|Ammo capacity: 30/300 |
|Zoom mode: standard advance |
|Vehicle damage: poor (1-2%) |
--------------------------------------------------------

--------------------------------------------------------
|Name: AK-47 |
|Caliber: 7.62x39mm |
|Fire modes: single shot, full auto |
|Ammo capacity: 30/300 |
|Zoom mode: standard advance |
|Vehicle damage: poor (1-2%) |
--------------------------------------------------------

--------------------------------------------------------
|Name: MK48 LMG |
|Caliber: 7.62x51mm |
|Fire modes: full auto |
|Ammo capacity: 100/600 |
|Zoom mode: standard advance |
|Vehicle damage: poor (3-4%) |
--------------------------------------------------------

--------------------------------------------------------
|Name: MG21 LMG |
|Caliber: 7.62x51mm |
|Fire modes: single shot, three shot burst, full auto |
|Ammo capacity: 100/600 |
|Zoom mode: standard advance |
|Vehicle damage: poor (3-4%) |
--------------------------------------------------------

--------------------------------------------------------
|Name: M8 CARBINE |
|Caliber: 5.56x45mm |
|Fire modes: single shot, full auto |
|Ammo capacity: 30/420 |
|Zoom mode: standard advance, zoom standard |
|Vehicle damage: poor (1-2%) |
--------------------------------------------------------

--------------------------------------------------------
|Name: M8/M320 |
|Caliber: 5.56x45mm/40mm* |
|Fire modes: single shot, full auto, grenade |
|Ammo capacity: 30/420* |
|Zoom mode: standard advance, zoom standard |
|Vehicle damage: poor (1-2%) |
--------------------------------------------------------

*: This is for the grenade launcher that is part of the rifle. Being an
explosive I shall include more of the stats below in the Explosives section.

--------------------------------------------------------
|Name: 36K CARBINE |
|Caliber: 5.56x45mm |
|Fire modes: single shot, three shot burst, full auto |
|Ammo capacity: 30/360 |
|Zoom mode: standard advance, zoom standard |
|Vehicle damage: poor (1-2%) |
--------------------------------------------------------

--------------------------------------------------------
|Name: MP5SD SMG |
|Caliber: 9x19mm |
|Fire modes: single shot, three shot burst, full auto |
|Ammo capacity: 30/210 |
|Zoom mode: standard advance, zoom standard |
|Vehicle damage: poor (2-3%) |
--------------------------------------------------------

5) Sniper Rifles

Sniper rifles are much less common than the assault rifles. These allow for
long range kills, although it seems that this game isn't all about stealth than
one might think. You can be looking at an enemy through your scope all the way
across the screen and he'll suddenly see you and start chasing and/or shooting
at you. So much for the stealth part. While the sniper rifles carry far less
ammo than the assault rifles they do pack more of a punch to targets. One round
from a sniper rifle provided it is a shot to the body of a target should be
enough to drop it.

--------------------------------------------------------
|Name: PSG-1 SNIPER |
|Caliber: 7.62x51mm |
|Fire modes: single shot |
|Ammo capacity: 5/40 |
|Zoom mode: standard advance, zoom advance |
|Vehicle damage: poor (4-5%) |
--------------------------------------------------------

--------------------------------------------------------
|Name: M107 SNIPER |
|Caliber: 12.7x99mm |
|Fire modes: single shot |
|Ammo capacity: 10/30 |
|Zoom mode: standard advance, zoom advance |
|Vehicle damage: medium (varies*) |
|Vehicle Damage (heavy armor): poor (1-2%)** |
--------------------------------------------------------

*: I'm not sure what to say on this. In the campaign mode the first mission
you can use it on, I shot up a truck with it and it did 24% damage per hit.
Used it on the jeep later on, and 60% damage. Later it was only doing 5-10%
damage on the truck behind it.

**: Yes you can use this weapon to damage heavily armored vehicles. Sure its
not much damage but every other weapon will not even dent them.

6) Explosives

Explosives are used primarily for what their name implies, to make things
explode. You'll always have three types of these at your disposal. A regular
grenade, smoke grenades, and some C4 to blow up stationary objects. I have
also included the other types of grenades fired from certain assault rifles,
plus the ZEUS MPAR rocket launcher. As with the handguns you cannot replenish
grenades without going to an ammo box.

There is a slight change to the charts for explosives. The grenades fired from
assault files have different icons associated with them, probably to let the
player know what is what. I've listed them for the three grenades they apply
to.

--------------------------------------------------------
|Name: Grenade |
|Icon: Human circled with a line through it* |
|Caliber: 40mm |
|Fire modes: single shot |
|Ammo capacity: Varies by weapon** |
|Zoom mode: varies by weapon |
|Vehicle damage: good (50-100%) |
--------------------------------------------------------

*: I am unsure what that means, whether its meant to be used against something
other than human targets, or just the opposite. You can kill yourself with it
if fired too close so I must say it works well against human targets.

**: This is rather odd. It seems that the M8/M320 holds 5 grenades max, 1
loaded and 4 extra, while the M29 OICW holds 6, all 6 loaded and no extras.

--------------------------------------------------------
|Name: Grenade |
|Icon: Vehicle circled with a line through it* |
|Caliber: 20mm |
|Fire modes: single shot |
|Ammo capacity: 6/0 |
|Zoom mode: standard advance, zoom advance |
|Vehicle damage: good (varies**) |
--------------------------------------------------------

*: As with the grenade above, I have no idea if this icon indicates whether or
not to use it against vehicles. It can damage them but not all at once. It
looks like a cluster bomb dropped from aircraft with various bomblets that look
like sparks around it.

**: As mentioned above this thing functions like a cluster bomb. You can hit a
vehicle with it and it drops its health by 1-2% a second and it sometimes lasts
for a few seconds and can drop it by 50% or more.

--------------------------------------------------------
|Name: Grenade |
|Icon: Flames* |
|Caliber: 20mm |
|Fire modes: single shot |
|Ammo capacity: 6/0 |
|Zoom mode: standard advance, zoom advance |
|Vehicle damage: good (75-100%) |
--------------------------------------------------------

*: Again I'm not sure on this but I think that it is an incendiary grenade.
Flames burst up when it hits something which probably adds to the damage.

--------------------------------------------------------
|Name: M67 FRAG* |
|Caliber: N/A |
|Fire modes: single shot |
|Ammo capacity: 1/4 |
|Zoom mode: standard advance |
|Vehicle damage: good (50-75%) |
--------------------------------------------------------

*: By holding down the fire button you can control how far you will throw the
grenade.

--------------------------------------------------------
|Name: M18 SMOKE* |
|Caliber: N/A |
|Fire modes: single shot |
|Ammo capacity: 1/2 |
|Zoom mode: standard advance |
|Vehicle damage: none |
--------------------------------------------------------

*: By holding down the fire button you can control how far you will throw the
grenade.

--------------------------------------------------------
|Name: DEMO CHARGE* |
|Caliber: N/A |
|Fire modes: single shot |
|Ammo capacity: 1/4 |
|Zoom mode: standard advance |
|Vehicle damage: good (75-100%) |
--------------------------------------------------------

*: After setting at least one charge of C4, one or all of them have to be
activated using the remote detonator. Select this from your grenade selection
to use it. Note that it only shows up after one Demo Charge has been set first.

--------------------------------------------------------
|Name: ZEUS MPAR |
|Caliber: 84mm HE |
|Fire modes: single shot |
|Ammo capacity: 1/3 |
|Zoom mode: standard advance, zoom standard |
|Vehicle damage: good (75-100%) |
--------------------------------------------------------

And there you have it. I do believe that is all the weapons in the game. With
any luck I haven't missed any because the ammo box at any time only holds three
weapons to choose from. The vehicle damage listing could be flawed too, I'm not
sure if the difficulty level has anything to do with that or not.

7) Credits

First off I'd like to thank CJayC and the rest of the Gamefaqs staff for
hosting my guides that I have made over the years.

I'd also like to thank Ubisoft, Red Storm Entertainment, and High voltage
Software for making such an entertaining game.

This document is ©2008 David Callander.