Sunday, December 30, 2007

Arrrrghh... my PSP is dead!!!

You were trying to play Tony Hawk's Underground 2 Remix on the PSP, while actually skating, and now you're left with a broken PSP. This hack will walk you through what can be done with your shattered PSP, as well as how to recoup as much of the original cost of the PSP as possible.

You're past the denial stage where you sat rocking back and forth in the corner of your room, cold and alone for hours, clutching it close to your chest, repeatedly switching it on and off, removing the battery, replacing the battery, plugging it in, hoping that suddenly your PSP would turn back on. You've followed all the recommendations in PSP troubleshooting in this blog. You took it to a friend skilled in the art of soldering. He opened up your PSP, gently reconnecting all the aged connections, perhaps even replacing the USB port. You tried new batteries and even an odd voodoo ritual that you discovered online. Nothing has worked. You've finally come to grips with the dreadful reality of it all: your PSP is dead.

Although everything has seemed hopeless during your futile attempts to resurrect your PSP, don't throw that PSP away in frustration. There are several different things you can do with it, and this blog will discuss some of the possibilities.

How to Put the Buttons and Shell into Place?

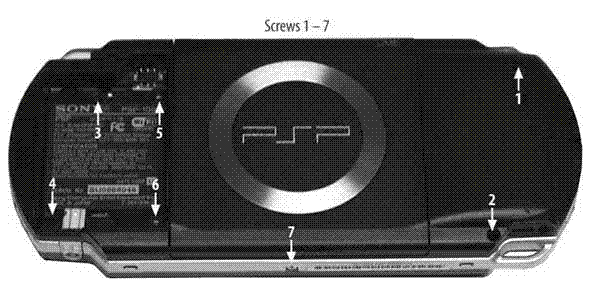
You're almost there! Try not to jump ahead and insert the battery just yet. Honestly, it is all downhill from here. The figure in previous post provides you with an illustration of where to insert the final screws.

Here's how to wrap things up:
  1. If you took the left and right trigger buttons out, now is the time to put them back in.
  2. Insert the circuit ribbon connected to the LCD buttons into its slot on the right side of the PSP.
  3. Lay the button strip onto the LCD and click it into place.
  4. Carefully clean off any smudges on the LCD using a soft cloth.
  5. Lay the PSP top onto the device and apply pressure to snap it into place. Be sure that the bottom button strip lines up.
  6. Flip the PSP over onto its back and insert screws 1, 2, 3, 4, 5, 6, and 7.
  7. Finally, insert the Memory Stick and battery/cover back into the PSP.

Wednesday, December 19, 2007

How to reinstall the LCD?

You are nearly there. The trickiest part of this step is to be sure that the LCD backlight power strip (the small one) is properly seated. You will note two small extensions on the sides of the strip near the end. These will come in handy when you attempt to seat the connector. Figures below highlight the areas you will be working with when reinstalling the LCD.

To reinstall the LCD:
  1. Lay the LCD tray into place. Do this slowly and carefully, since the wrong position can cause problems. The top of the tray should slip behind the USB connector. The bottom of the tray has a screw mount that slides under/behind the black PSP shell. Finally, the left side of the tray merges with the left controller. Once it is in place, shut the UMD tray. If it clicks smoothly shut, the tray is probably installed correctly.
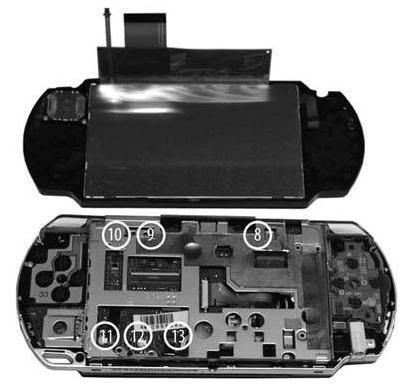
  2. Insert and tighten screws 8, 9, 10, 11, 12, and 13.
  3. Flip the LCD over on its back, slide the large and small circuit ribbons into their respective slots, and close the catch. Start with the large ribbon first, and then do the small ribbon. Use the little wings on the small ribbon to guide it into the catch.
  4. Flip the LCD over and carefully insert it into the tray. Start with the right side, and then apply light but firm pressure on the left side to click the LCD into place.

Tuesday, December 18, 2007

Installing the Main Circuit Board

This post is about the hardest part of reassembling the PSP. It can be a bit tedious to ensure that you have the board seated correctly, but patience is necessary. Pay attention to the critical areas highlighted in picture below:
To install the main circuit board:

  1. Place the main circuit board in roughly the correct location.

  2. Carefully bend out the top of the PSP plastic case and slip the USB connector into its corresponding hole.

  3. Line up the screw holes and apply a slight but firm pressure about one inch in from the left side of the circuit board. This is to seat the connector on the other side of the board into the smaller circuit board that holds the WNIC and Memory Stick components.

  4. Run the antenna wire across the circuit board and install the wireless antenna. Once the antenna is properly seated, install the antenna wire correctly, ensuring it is held in place by the black fuzzy tape, and that it is threaded through the channel on the right side of the PSP.

  5. Line up and insert screw 15 to install the left controller. If you removed the left controller completely from the PSP, be sure to connect the circuit ribbon.

  6. Insert screw 14 in top-right hole of the main circuit board.

  7. Connect the white power connector to the PSP circuit board, using the fuzzy tape to hold the wires onto the board.

  8. Lay the right controller on top of the antenna and snap it into place, paying attention to the catch on the lower side of the controller circuit.

  9. Connect the right controller strip by sliding the ribbon into the catch. It will slip under the tiny silver guides on each side of the catch. Finally, flip the brown movable part of the catch down into place.

  10. Slip the UMD drive circuit ribbon into its catch. Be sure that the black part of the catch is in its Out position. Otherwise the ribbon will not insert into the catch. Once it is lined up in the catch, apply pressure to both sides of the black catch to seal the connection.

Saturday, December 15, 2007

How to reinstall network card?

This step is fairly simple, with the only tricky part being the correct insertion of the WNIC (wireless network interface card)/Memory Stick circuit board. Be sure to take advantage of the many guide pins included in the PSP to ensure that you insert this component, and others, correctly.


To install the network card:
  1. Insert the small circuit board, wireless network card side down, into the PSP by placing the bottom of the circuit board in first at an angle. Be sure that the wireless antenna is wrapped around the side of the board.

  2. Lay the metal grounding separator in, with the long end at the top. Align the guidance pins and the circuit socket to be sure the separator is in the correct location.

  3. Place the black plastic supporting piece on top of the WNIC, ensuring that both the top and bottom guide pins slip through their respective holes. Be careful to not break the wireless on/off switch as you insert the black plastic piece. You will probably have to move the switch into the On position for easiest installation.

  4. Insert screws 16, 17, and 18.


Friday, December 14, 2007

How to remove network card from your PSP?

The following requires you to remove several components before you actually get the network card board (SWU-BXJ154N). This part of the removal is layered, so be sure to follow the instructions. Figure 1 highlights the significant pieces and Figure 2 provides a shot of the network card with antenna and wire.

To remove the network card:

  1. Remove the silver screw (16) from the top left of the PSP, holding the silver tray onto the device.
  2. Remove the silver screw (17) from the bottom left of the PSP, holding a black plastic supporter.
  3. Remove the silver screw (18) from the left of the PSP, holding the black plastic supporter.
  4. Lift the black plastic piece out and then remove the silver grounding tray.
  5. Lift the network/Memory Stick combo circuit board out of the PSP shell.

Thursday, December 13, 2007

How to remove PSP mainboard?

This part of the disassembly process is the most difficult. The main board is connected via screws, a USB connector, and a circuit connector hidden under the board. In addition, there are wires at the lower end of the board that connect to the speakers and components under the board. You do not have to remove these to get under the board if you simply flip the circuit board over onto its top when it is removed.

To remove the main circuit board:
  1. Unlatch the right controller circuit strip and the UMD drive circuit strip.

  2. The controller lifts from the bottom, and the UMD catch requires slight pressure from the left against the black plastic arms.

  3. Remove screw 14 from the top right of the circuit board.

  4. Remove screw 15 from the left side of the left controller.

  5. On the top right of the main circuit board, carefully remove the power connector (white with black wires). This will require you lift the board first before disconnecting the white plastic socket.

  6. On the lower side of the left controller, pry up the circuit board over the catch and lift the controller over the top of the PSP.

  7. Peel back the tape holding the black power wire and lift the antenna off the main circuit strip, disentangling it from the tape and the right controller.

  8. Slowly lift the circuit board up off the PSP by slipping out the USB connector from the top plastic shell, then raising the top of the board and flipping it over the bottom of the PSP. You will need to apply pressure and pry the board off a hidden connector that keeps the board connected to components deeper inside the PSP.


Chip 1

CXD2962GG

©2004SCEI

507D10E

641711


Chip 2

CSD1876

©2004SCEI-102GG

504A99E

278491


Chip 3

SAMSUNG 501

K5E565H8CM-D060


Chip 4

SC901583EP

MXAEA0423


Chip 5

MB44C001

0505 M51

Sunday, December 9, 2007

How to remove the LCD Tray?

The most important part of this stage is that you carefully record where each screw goes. Since most of the screws are different sizes, it would be easy to mix them up. Picture below illustrates where each of the screws is located.

Be careful not to strip the screws. It is better to apply pressure to ensure the screwdriver head does not slip than it is to strip the screw.

Here's how to remove the LCD tray:

  1. Remove the silver screw (8) from top right of tray.

  2. Remove the two silver screws (9 & 10) from the top left of the tray.

  3. Remove the two silver screws (11 & 13) and one black screw (12) from the lower left of the tray.

  4. Eject the UMD disk tray.

  5. Lift the tray from the bottom of the PSP and slowly wiggle it loose from the UMD catch at the top of the PSP.

Friday, December 7, 2007

How to remove the LCD?

The next step is to remove the LCD from the PSP. Be careful, as this is arguably the key component to your device and almost certainly the most expensive to replace. A scratch or too much pressure could cause serious problems.

  1. Carefully pry the catch off the left side of the lower button circuit strip with a small flat head screwdriver.

  2. Lift the button bar assembly off the PSP.

  3. Carefully release the catch to the circuit strip that connects the bar to the PSP. This is accomplished by using a small flat head screw driver to lift the brown catch up, which allows the circuit strip to slide free of the catch.

  4. The LCD is held in place by four bevel catches to keep the LCD screen in a metal LCD tray. Carefully slide a flat head screwdriver between the LCD screen and the tray at the top-left corner and lift the LCD screen out of the tray. Once it has freed the catch, do the same on the lower-left side of the LCD tray. Once this side is free, slowly lift the LCD screen up a few millimeters out of the tray and then lift only the top of the LCD screen. There are two circuit strips behind the LCD that need to be removed before taking out the LCD.

  5. Lift the left (smaller) catch from the top to release the circuit strip.

  6. Lift the right (larger) catch from the bottom to release the larger strip.

Getting a feeling when releasing the catches takes a little practice. You must not break off the plastic catches or break a circuit in the connector.

Thursday, December 6, 2007

How to remove the top of PSP?

Prior to beginning, place your PSP and all tools on a clean and clear surface. I recommend you have some sort of mat to provide some comfort for your PSP while its internals are removed. Next, create a few sketches of your PSP on the piece of paper, in order to track where the screws go when trying to put the PSP back together again.


Here's how to take the top off:
  1. Remove the battery cover and remove the battery.

  2. Take out the Memory Stick.

  3. Remove the black screw (1) from the upper-right quadrant

  4. Remove the black screw (2) from the lower-right quadrant.

  5. Remove the warranty seal from inside the battery cavity (yup, you've just voided the warranty).

  6. Remove the black screw (3) from the upper-left quadrant (battery cavity).

  7. Remove the black screw (4) from the lower-left quadrant (battery cavity).

  8. Remove the silver screw (5) from the battery cavity.

  9. Remove the silver screw (6) from the battery cavity.

  10. Remove the silver screw (7) from bottom side of PSP.

  11. Turn the PSP over and slowly lift the top shell off.

Wednesday, December 5, 2007

Preparation before you start dsimantling your PSP

Tools
It is recommended that you prepare the following tools. You may not have to use them all, but everything can go much more smoothly with these tools available:

  • Paper and pen for taking note on screw placement

  • Small flat head screwdriver

  • Small Phillips head screwdriver

  • Needle nose pliers (good for picking up dropped tiny screws)

  • Flat and clean white surface (easier to see small parts)

  • Digital camera for documentation, it would be helpful when you have trouble reassembling your PSP.


Preparation
You also have to make these preparation:

  • Remove the battery when instructed and leave it out when taking apart the PSP. In addition, do not attempt to plug in any power source to the PSP until it is fully reassembled. You can easily fry critical parts of PSP.

  • Use extreme care when releasing circuit strip/ribbon catches, since they can easily break.

  • Do not drink or eat around the open PSP. A shower of cola on your dismantled PSP would be a kiss of death.

  • Do this in a quiet area. There is nothing like a hyper-naughty kid, slobbering pet, or three-foot drop to turn your PSP into a $250 paperweight.

  • Be careful how much dust is in the air. Since your PSP will be apart, it is easy for that dust to cause problems at a later date if it takes up residence inside the device.

Monday, December 3, 2007

How to keep your PSP screen smudge-free?

The most obvious way to keep the screen on your PSP smudge-free is to avoid touching it with your hand, keep your hands as dry, clean and grease-free as possible, and keep soft non-abrasive cloth nearby to wipe smudge. If these methods do not work for your PSP, there are some alternatives.

One option is a commercially available plastic screen. There are currently a number of plastic screen that keep your screen smudge-free. The anti-glare version works very well, as I have one that I've used, but I usually end up using it only while playing video games. The matte finish tends to make the picture quality of movies look a bit fuzzy. You may also can buy the ultra-clear version to maximize the clarity of your screen.

If you think branded plastic screen a bit too expensive, you may find inexpensive cellophane at your local craft store that will most likely work just as well.

Overall, remember that the best way to keep your PSP clean is to prevent it from getting dirty in the first place.

Saturday, December 1, 2007

How to clean your PSP?

You could use soft cloth that is included with your PSP to wipe off the smudged screen. But after long-term use and it is more than smudged. Turn it off, use a damp cloth to clean the casing. Do not use any cleaning solvent products, as they could harm your PSP.

If something sticky gets on your PSP casing, put a tiny amount of cooking oil on a soft cloth and use it to clean it off. Then to remove excess oil, use a damp cloth with a a little amount of soap.

If something stucks inside the ports , such as the USB jack, headphone jack, or the power jack, gently rub the open ports with a soft dry cloth. If something stuck inseide the Memory Stick compartment or the UMD compartment, use a compressed air can to loosen up dirts out of these areas. If the lens inside the PSP that reads the UMD disks seems to be dirty, you can try putting a tiny bit of the solution from a DVD/CD cleaning kit on the end of a Q-Tip and reach carefully inside your PSP to clean the lens. Make sure the solution is safe for your PSP.