Repeat all the steps from the last section up until you are ready to select your default connection. Highlight the connection and hit the Triangle button. An overlay menu will appear on the right side of the screen. Use the directional keypad to select Edit from this menu and then hit the X button.
All of these settings can be accessed from the main Settings menu on your PSP (Settings Network Settings). For the purposes of this hack, I'm showing you how to edit a preexisting connection from within Wipeout Pure, but if you think you will be surfing the Web via your PSP on a regular basis, it makes sense to set up a few extra connections.
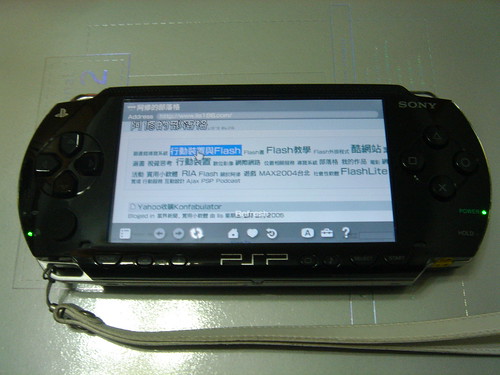
I have three connections set up. Connection 1 is just the default connection for game playing over the Internet and downloading PSP updates and in-game downloads such as the Gamma Pack 1. The other two connections connect to various online portals, which I am about to discuss.
Once you select Edit, you will be presented with a series of screens. The first screen is the connection name. If you want to change it, you can, but I'm leaving it as Connection 1. Simply hit the right directional keypad to move on to the next screen. This is the WLAN Settings screen. Highlight Scan and press X to scan for any networks in range. Pick the one you want and hit X again. You will be returned to the WLAN Settings screen. Hit the right directional key to move on to the next screen. Configure the appropriate WLAN security settings and hit the right directional key again.
Now you will be presented with the Address Settings screen. You have a choice between Easy and Custom. Select Custom and hit the X key. This will immediately bring you to the IP Address Setting screen. You can either leave this set to Automatic and move on to the next screen to make the necessary changes to your DNS Settings to use a public PSP web portal, or you can choose Manual and hit the X button.
In the Manual Network Connection pane, I gave the PSP an IP address of 192.168.1.18 (so that it would not conflict with the other IP addresses I've assigned on my network), left the subnet to the default 255.255.255.0, and set the Default Router to 192.168.1.1, the address to my wireless access point. To make the changes, you have to hit X on each field you want to change, and then scroll up and down using the directional keypad until you hit the right number, then hit X again to get to the next field. If the network you are connecting to uses automatic (DHCP) assignment for some or all wireless users, you're better off selecting Automatic for the IP address assignment. My manual settings will probably not work for you.
If you'd rather not spend all this time making sure that the IP and Subnet settings are all perfect, you can skip much of this by selecting Automatic instead of Manual on the Address Settings screen, then when the DNS Settings screen appears, selecting Manual. This will allow you to only change the relevant DNS settings before moving on.
The important change for this hack is the Primary DNS. Even if your network uses DHCP assignment, you must override its default settings. You should make the Primary DNS 24.3.244.76, which is the address of the fujimax PSP Web Portal. If you want to check out the fujimax PSP Web Portal before performing this change on your PSP, visit http://24.3.244.76/wipeout/index.html from your desktop computer. You can, if you'd like, set the Secondary DNS to the DNS server that the wireless access point is configured to hand out. Although this gives you a back up if, for whatever reason, the fujimax PSP Web Portal is down, it won't let you redirect the browser to the PSP Web Portal.
The IP address of the fujimax PSP Web Portal changed once before from 67.171.70.72 to 24.3.244.76. If you try to access it and it doesn't come up, check in the sidebar of the blog associated with the portal (http://genius.fujumax.com/weblog/index.html) to see whether the IP address has changed yet again.
After you have completed all the proper entries, click on the right arrow on the directional keypad to move to the next screen. Make sure that Do Not Use is highlighted under Proxy Server and then hit the right arrow again to move on to the Setting List screen, which will give you a summary of the settings you have just entered. Hit the right arrow button again and press X to save your settings.
If you are on Version 2.0 of the firmware, you'll be asked whether you want to launch an Internet browser before you review your settings. You can choose Do Not Start unless you are in a hotspot that requires you to log into a web portal before you can access the Internet. Of course, 2.0 users don't need to use the Wipeout Pure hack, but I'm sure some of you want to try it out anyhow!
This will return you to the Select Connection screen. Select the connection that you just edited and hit the X button. When you hit this, the PSP sends out a request for http://ingame.scea.com/wipeout/index.html, but since you changed the Domain Name Server to 24.3.244.76, the request for this page is redirected by that DNS server to http://24.3.244.76/wipeout/index.html, the address for the fujimax PSP Web Portal. Click on the X button to enter the portal.

No comments:
Post a Comment