Wednesday, June 25, 2008

Setting up the DNS Hack

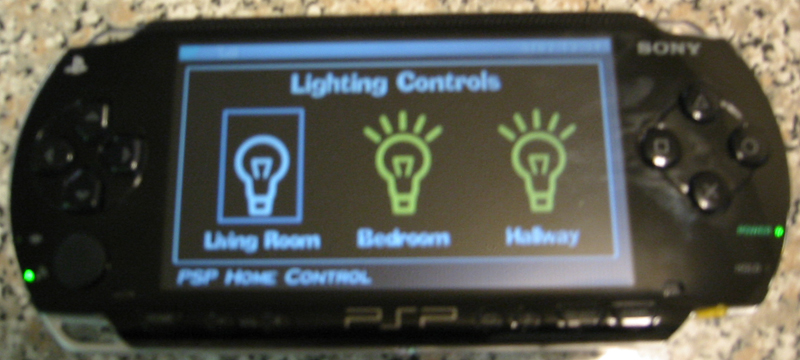
Are you one of the lucky few living in the world of tomorrow with an entire home network that actually networks control of your home? If so, wouldn't it be nice to control your home wirelessly with your PSP? Read on to find out how.

When the Wipeout Pure browser hack came out, I saw someone controlling his Xbox Media Center from his PSP browser. It's great that you can control XBMC from your PSP, but what if your Xbox isn't on, and your TV isn't on, and your TV is not on the right input? You still have to get up or find the remote and adjust all of that.

I've come up with my own solution.

This hack first appeared on LiquidIce's PSP Hacks and quickly spread around to various web sites (go to http://psphacks.blogspot.com/2005/04/psp-home-control-10.html).

The first step was to be able to redirect the Wipeout Pure browser to any URL I wanted. To do that, I turned to MooPS (http://www.layouts.xbox-scene.com/main/filemanager/index.php?action=downloadfile&filename=SetupMooPS_1.0.1.rar&directory=Software&), which is a DNS/web server that you run on your Windows computer. It automatically forwards requests for http://ingame.scea.com to the URL of your choice. For another way to set this up.

If you have Version 2.0 of the firmware, you can simply navigate to the page you create rather than bothering with this redirect, which is only necessary due to the limitations of the Wipeout Pure browser.

Configuring Your PSP


You will now need to configure your PSP to use another DNS server. Follow the instructions discussed in that hack, but instead of entering the IP address of a web portal on the Internet, enter the IP address of your DNS server. Now fire up Wipeout Pure, choose the connection you just created/edited. Nothing too fancy, but the more links you add to the HTML, the more impressive and useful your web portal will be.

Congratulations! You can now create and access custom web pages from your PSP.

If you want your web portal to be accessible to other devices via the Internet, there are a few changes you must make to the method outlined above. First, you will need to change the following entry in scea.zone:

ingame A 192.168.0.100


to:

ingame A XX.XXX.X.XXX


where XX.XXX.X.XXX is the external IP address given to your computer/router. You can find out what this is by going to http://www.whatismyip.com.

The next thing you must do is set up your router to forward incoming traffic on ports 53 and 80 to your DNS/web server. Connecting to a web interface built into your router usually allows you to do this. Consult your router's documentation on how to forward ports to individual machines on your network. You will need to forward ports 53 (UDP) and 80 (TCP) to your web server's internal IP address (i.e., 192.168.0.100, as used earlier).

Finally, change the DNS setting on your PSP to use your computer/router's external IP address instead of your web server's internal IP address.

You should now be able to access your web portal from home or anywhere else.

The Web Server


Now that it is possible to have your PSP access the IP address of your choosing, it's time to set up a web server from which you can serve your custom web portal.

Like the DNS server, the first step is to install a web server on your computer. If you're using a Mac, you can turn on the preinstalled Apache web server by going into System Preferences, clicking the Sharing icon, and checking the box next to "Personal Web Sharing." If you're using Windows or Unix, you will need to install a web server such as Apache (Version 2 suggested). Apache is an open source web server that powers many commercial web sites. It can be downloaded at http://httpd.apache.org/download.cgi. If you're using Windows, you will want to download the .msi install package and follow the instructions that come with it. If installing Apache in a Unix environment, you may be able to find a precompiled install package for your distribution. Otherwise, you'll have to compile the source code yourself and continue installation from there.

Like DNS servers, there are many web servers available. Also, if you have one already installed, there is no reason to install another.

When the PSP makes a request from Wipeout Pure, it asks for the /wipeout/index.html file. So what we must now do is create a file named index.html and place it where the PSP can access it.

Use this html file

Next, you need to create a directory called "wipeout" in your web server's root directory. On a Mac, the root directory will be /Library/WebServer/Documents, so you will create the directory /Library/WebServer/Documents/wipeout (this is not to be confused with the Library folder in your home directory). If you installed Apache in Windows, you will want to create the directory in C:\Program Files\Apache Group\Apache2\htdocs. Then, simply place index.html in the wipeout directory.

If you are using Apache in Unix, or are using another web server, consult the server's documentation to identify the root folder from which web pages are being served.

That's it! Now you can test it using your PSP.

Monday, June 16, 2008

How to Set Up the PSP DNS Server?


Before you can start serving web pages to your PSP, you need to first trick the PSP into believing that your web server is someone it's not. When you load up the "Downloads" section of Wipeout Pure, your PSP attempts to retrieve data from the following domain: ingame.scea.com. Normally, the IP address returned by your Internet service provider's DNS server would belong to Sony and would direct you to downloadable Wipeout Pure content. However, by setting up your own DNS server, it is possible to "trick" the PSP and return the IP address of a web server of your choice.

The first step in setting up a DNS server is installation. If you are using a Mac or a Unix variant, the most common DNS server used is BIND. If you are using Windows, a good (and free) DNS server is TreeWalk DNS (http://www.ntcanuck.com). Installation guides are included with both of these server packages when you download the software, and are pretty straightforward. Further, these are just recommendations; there are dozens of DNS server software packages available for virtually every platform.

Once installed, you now need to configure your DNS server to resolve ingame.scea.com to the IP address of your web server. There are two files you will need to create and edit: scea.zone and named.conf. First, we will create the scea.zone file. Using a text editor, create a new file called scea.zone (make sure there is no .txt appended to the filename) and type in the following:

; scea.zone
; scea.com db file
$TTL 86400
@ IN SOA scea.com dummy.scea.com. (
050622 ; Serial
10800 ; Refresh
3600 ; Retry
604800 ; Expire
86400 ; Min TTL
)

; Addresses for canonical names

NS 192.168.0.100
A 192.168.0.100
ingame A 192.168.0.100
webcluster A 192.168.0.100

$ORIGIN scea.com.

In the preceding example, 192.168.0.100 is used as the IP address of the DNS/web server you are setting up. Replace each occurrence of that IP address with the IP address of the machine you installed the DNS server on.

Where this file must be placed on your computer depends on the DNS server you installed. If you're using BIND, the file should be placed in either /etc/namedb or /var/named, depending on how it was installed. If you're using TreeWalk DNS, place the file in C:\Windows\System32\dns\etc. If you installed another DNS server, consult the documentation that came with the software to see where DNS Zone files must be stored.

All that's left to do now is to make your DNS server aware of the new DNS Zone you have just created. To do this, locate the named.conf file on your computer. If using BIND, this file may be found at /etc/named.conf. For those using TreeWalk DNS, the file is located at C:\Windows\System32\dns\etc\named.conf. Again, consult the server documentation if you are using another DNS server.

Once you've located the file, simply append this entry to the end and save the file:

zone "scea.com" {
type master;
file "scea.zone";
};

All that is left to do is restart the DNS server so it takes note of the new DNS Zone. If you're using BIND, run the named executable.

This will need to be done via a shell prompt, and most likely will require root privileges. To run the executable with root privileges, type the command sudo named. You will then be prompted for the root password to your machine.

If you're using TreeWalk DNS, access the TreeWalk control panel via the Start menu and click "Reload" and then "Start" if the server isn't already running.

That's all for the DNS server; now it's time to set up the web server.

PSP Web Server Introduction

So you've been browsing the Web with your copy of Wipeout Pure, but up until now, you've had to depend on someone else's web portal. You've had to use his links, navigate his design, and use the functionality he provides. All this in addition to worrying about whether or not the portal itself is even currently working.

This tips, however, will free you from the constraints that come with relying on someone else's portal. By setting up a DNS (Domain Name System) and web server on your computer, you will be able to create and use your own customized PSP web portal. The directions given here assume you will be setting up your DNS and web server on the same computer.

More about browsing in PSP

If you haven't upgraded to Version 2.0, and you didn't already know about the Wipeout Pure hack, you are probably amazed by being able to surf the Web on your PSP. If you want to take things a step further, however, you're going to want to serve up your own PSP web portal customized with your personal favorite links. While creating that portal, you might want to embed your own QWERTY keyboard via Javascript that will work in place of the PSP's rather clunky text-entry screen. There are lots of tricks you can do with this starter hack. Thumb through the table of contents of this book, and you'll spot quite a few.

If you really want to take full advantage of the feature-rich web browser included with Version 2.0 of the firmware, you're going to want to spend some time making an index.html file at the root level of your Memory Stick, cataloguing all the files you may want to quickly access while on the go.

Wednesday, June 11, 2008

Offline browsing in PSP firmware 2.0

One of the best features of the PSP's browser is its ability to view files without a live Internet connection.

If you have a home page set (Tools > Settings> Home Page), your browser will insist on checking for a live Internet connection when you first launch it, and if you have your WLAN switch turned off, it will not launch properly. So make sure that your WLAN switch is in the On position, navigate to Network > Internet Browser, and hit the X button. As the PSP attempts to connect to the Internet, hit the O button to cancel the connection. Now hit the Triangle button to bring up the browser's interface.

You can avoid this problem by setting the home page to be a blank page (or by setting a home page that resides on your memory stick).

Navigate to the address bar and hit the X button. Here, you can browse the file structure of your PSP's Memory Stick (providing you know where everything is located) and view any files that the browser is capable of displaying (.html, .htm, .php, .txt, .png, .gif, .jpeg, .jpg, and .bmp, to name a few of the most common). For example, if you want to view a picture in your Photo folder, you would simply enter file:/PSP/PHOTO/nameofpicture.jpg in the address bar and hit the X button to load the image. For images, this isn't really that useful, but you can save all sorts of documents as text or HTML on your Memory Stick and load these files for reading on the go. This is a very useful little feature that I use for notes and reading on-the-go daily. And after you've finished entering the long text string to get to your important files, don't forget to bookmark the file (Triangle button > Bookmarks > X button > My Bookmarks > X button >Add to Bookmarks > X button) so that you can easily get to the file in the future.

Tools menu in PSP firmware 2.0 web browser

The Tools menu is particularly useful, not only because it is where you need to navigate to set the preferences for the browser, but because it is the first place you want to navigate whenever you are troubleshooting. Selecting Settings from this list opens the Settings screen, where you can set your home page, and under View Settings, you can choose to toggle on and off JavaScript, images, and animations, set proxy settings, and determine your cookie and cache settings. The other options under the Tools menu allow you to delete your cookies, cache, authentication information, and input history, as well as display your current connection status. If you ever get an out-of-memory error while trying to load a page, try navigating to the Tools menu and selecting Delete Cache, then navigating over to Refresh and hitting the X button. I've found that this often corrects the error, and the page loads successfully.

View menu in PSP firmware 2.0 web browser

The View menu lets you change the different display options for the browser. You can choose text size from small, medium, and large, switch the encoding, and switch between different display modes: Normal, Just-Fit, and Smart-Fit. In Normal display mode, the page width is not adjusted, so you must pan and scan around the web page. This is typically the mode I use, as it tends to best represent the normal experience of web browsing that I am used to from using a computer.

Just-Fit adjusts the page width to match the screen width; at least, this is what it is supposed to do. In reality, it seems to only manage to shrink the columns of some web pages. Smart-Fit reorganizes web pages so that the different columns are stacked on top of each other and the main content is at the top. This can make for some clunky navigation of some web sites, so I generally avoid this view mode; however, you may prefer scrolling up and down to scrolling side to side and up and down, as in Normal display mode.

Thursday, June 5, 2008

File menu in PSP Frimware 2.0

The File menu gives you the option to close the browser, close the page, display the page's certificate, display the page information, save an image, save a link target, open a link in different tab, or open an address entry field. The most useful options in this menu are the Close Page option (to close an unwanted tabclose these often to keep from running out of memory), the Save Image option (to save images to your Photo folder for viewing on your PSP), and especially the Save Link Target option. Save Link Target allows you to download files to your PSP, whether they are a known file type or not. This is particularly useful if you come across an important web page that you want to save for later offline viewing. Simply use the L trigger to move back to the linking page, then place the cursor over the page you want to save, hit the Triangle, select the File menu, hit the X button, select Save Link Target, and hit the X button again. Take note of where you save the file, since you can navigate to it again in your web browser by typing file:/filelocation/filename.html. You can also use this feature to save files that are incorrectly recognized and try to load as text in the browser.

Tabbed browsing and JavaScript

One of the really cool things about this browser is that it is a fully functional JavaScript-capable browser with tabbed browsing capabilities. You have three tabs to work with and can switch between them by holding down the Square button and hitting the L or R triggers. You can also run most JavaScript. It can handle complex web sites like Flickr (http://www.flickr.com) and Gmail (http://gmail.google.com). Flash is currently the Achilles' heel of the PSP browser.

Browser basic controls of PSP with 2.0 Firmware


Hitting the Triangle button while the browser is loaded on your PSP displays the browser's full interface, complete with an address bar.

If you navigate over to the ? (or Help) menu and hit the X button, a screen showing all the basic controls of the browser will be displayed.

The L trigger moves back, while the R trigger moves forward. The Triangle displays the menu, the Circle closes the browser, and the X button is enter, and it will also open links you have selected. If you hit the X button and hold on a link, it opens the link in a new tab. Pressing the Square button while moving the analog stick scrolls, using the Square button with the directional keypad scrolls the page, and the Square button plus the triggers moves to the previous or next tab.